A visual artist often needs to make a photo opaque into another photo or color background. Photoshop has multiple processes to accomplish it, and using a gradient is one of the most accessible. Though the use of gradients had become vague in the past, it has come back with a new trend.
Do you know what a gradient is and how to create a gradient in photoshop?
In this blog, I will share all the possible details of a gradient and the technique of creating a gradient with Photoshop’s gradient-related features. Therefore, reading the blog once you learn the basics, you will be able to benefit from all the other gradient features of Photoshop to create mesmerizing work. So, let’s jump into the cab to learn the action.
What is Gradient in Photoshop
In general terms, the gradient is the ongoing transition from one color to another. In Photoshop, it is a feature that the designers use to create a progression of color from one shade to another with different shapes or settings. It can range from smooth to harsh or linear to other shapes.

Gradients are also called color transitions, color progressions, and color ramps. Whatever it is called, the primary function is the same. It creates an aesthetic color mix by blending two or more colors that are different from the traditional color wheel. Here, you can mix the same color or different colors.

Styles of the Gradient
The color gradient is the passage of colors from one to another. It is not the same as Photoshop Color Correction. However, you can get multiple types of gradient styles in Photoshop and change between them within a second. Therefore, you can instantly notice all the gradient styles besides the gradient editor. Let’s go through each gradient style.
- Linear Gradient: Photoshop’s first and most commonly used gradient type is the Linear Gradient. In the linear gradient style, the color shade smoothly moves from the start to the end point in a straight line. It creates a horizontal or vertical gradient effect.
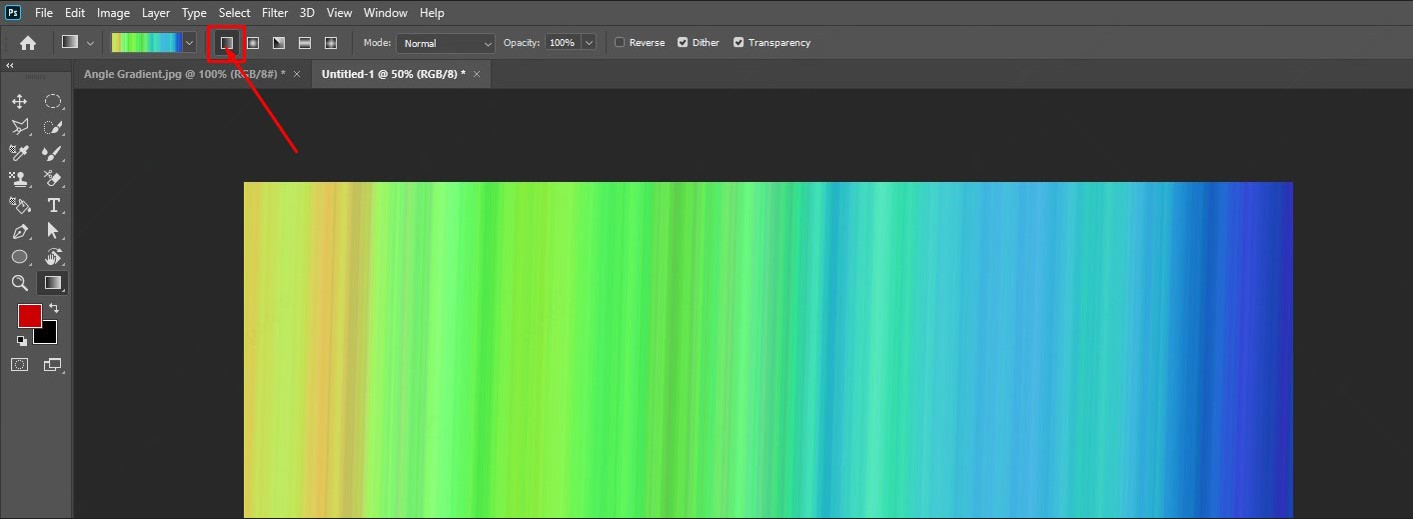
- Radial Gradient: The second gradient style of the gradient editor panel is the radial gradient, where the color radiates from the central point to the ending point in a circular pattern. This gradient style is excellent for using layers masks or creating a beautiful sunset effect with multiple colors.
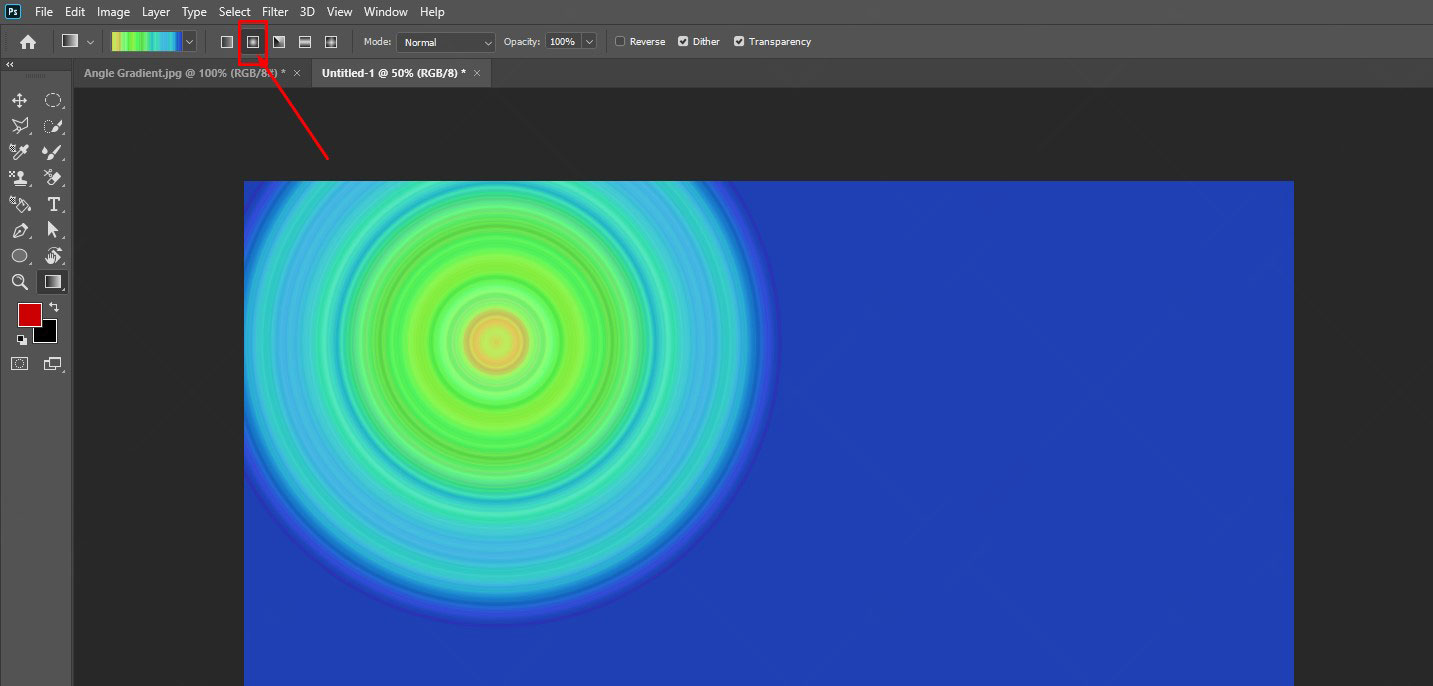
- Angle Gradient: The angle gradient is the third gradient that will take up the entire layer, and the color shade transits in a counterclockwise rotation from the starting point.

- Reflected Gradient: Reflected Gradient echoes the same shades above and below the central color line creating a mirror effect. This gradient type is excellent for positioning against horizontal or vertical edges in the photos.
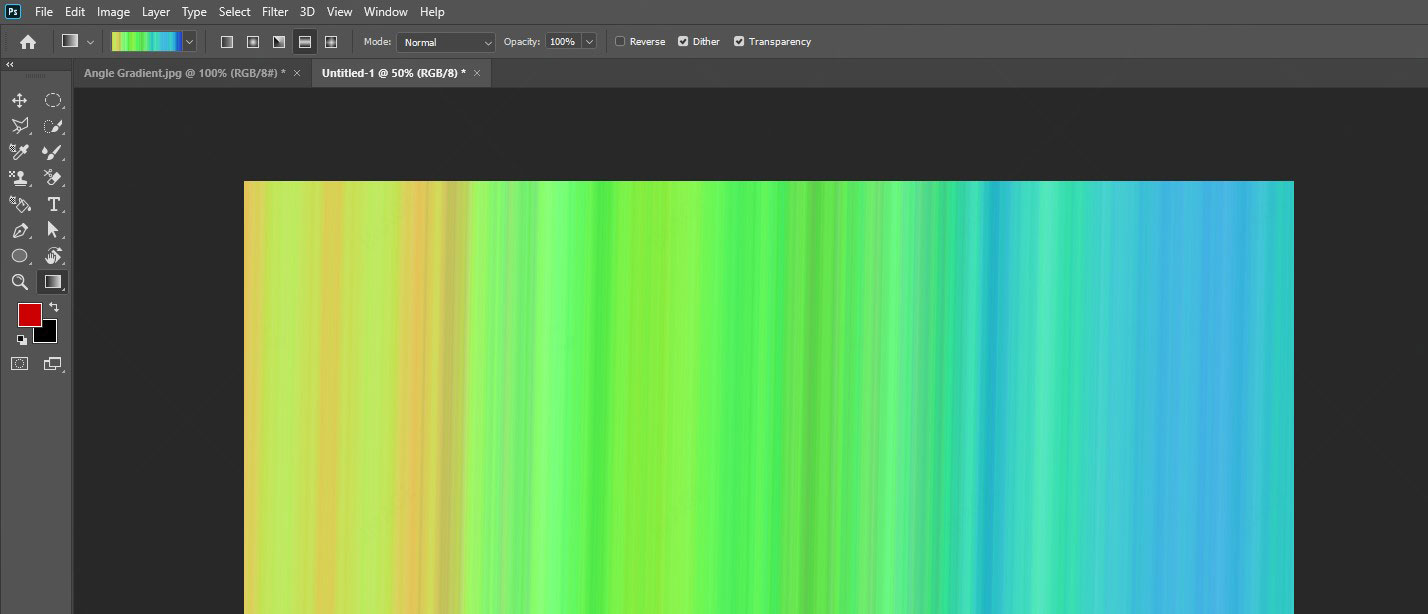
- Diamond Gradient: According to the name, this Gradient creates a diamond shape with the colors arising from a central point to the outer side.
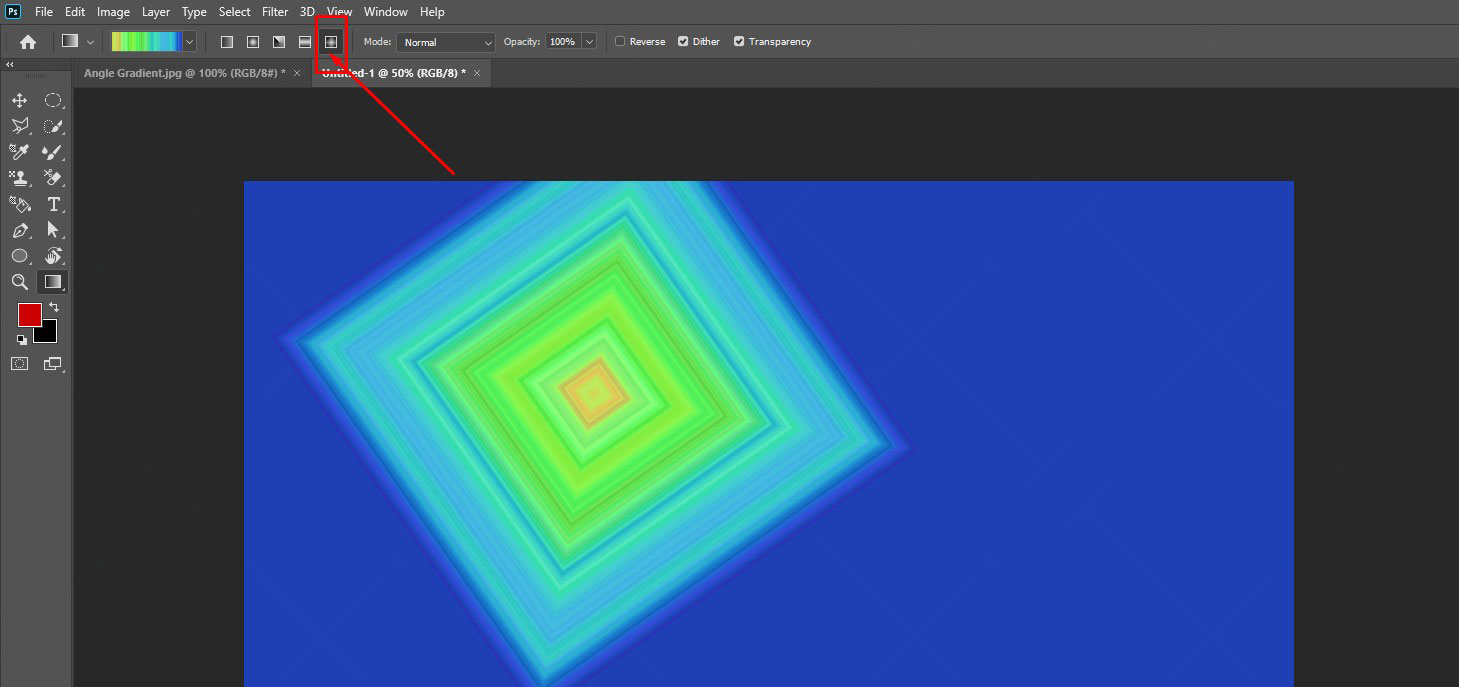
Gradient Tool Settings
As a part of Photo Retouching, Along with selecting the gradient style, you must go through a few settings before creating the gradient in Photoshop. Let’s have a trip on the setting options:
#1. Blend Mode:
The first option for the gradient is the blend mode. The blend mode performs like the layer blend mode but is applied only to the new gradient. Set the blend mode to “Normal” for regular use.
#2. Opacity:
The next setting option is the opacity option which will modify the visibility of your gradient settings. If you want to make the gradient visible, keep the opacity 100%. You can decrease the opacity options to make it invisible or slightly visible.
#3. Reverse:
The reverse option will switch sides and reverse the gradient if you checkmark the reverse option. You can apply this option if you want to use a specific gradient color from another side.
#4. Dither option:
The dither option creates a smooth evolution between various shades in your gradient. You can checkmark the dither option to activate the effect on your gradient. You should check off the dither option if you want a high-quality gradient.
#5. Transparency:
This option will let you make the gradient transparent by putting the transparent value. For instance, if you want to make the transparency of the gradient visible in the foreground, you need to check off the transparency. Generally, check off the box beside the Transparency option whether or not you’re creating a transparent gradient.

How to Create a Gradient in Photoshop
One of the most potent tools in Photoshop is the Gradient. Photoshop lets the user construct an incremental transition between two or more colors utilizing the Gradient Tool. It also offers numerous patterns for the Gradient and enables you to create your pattern. Follow the below steps for creating a gradient in Photoshop for personal.
- Open Photoshop and create a new canvas.
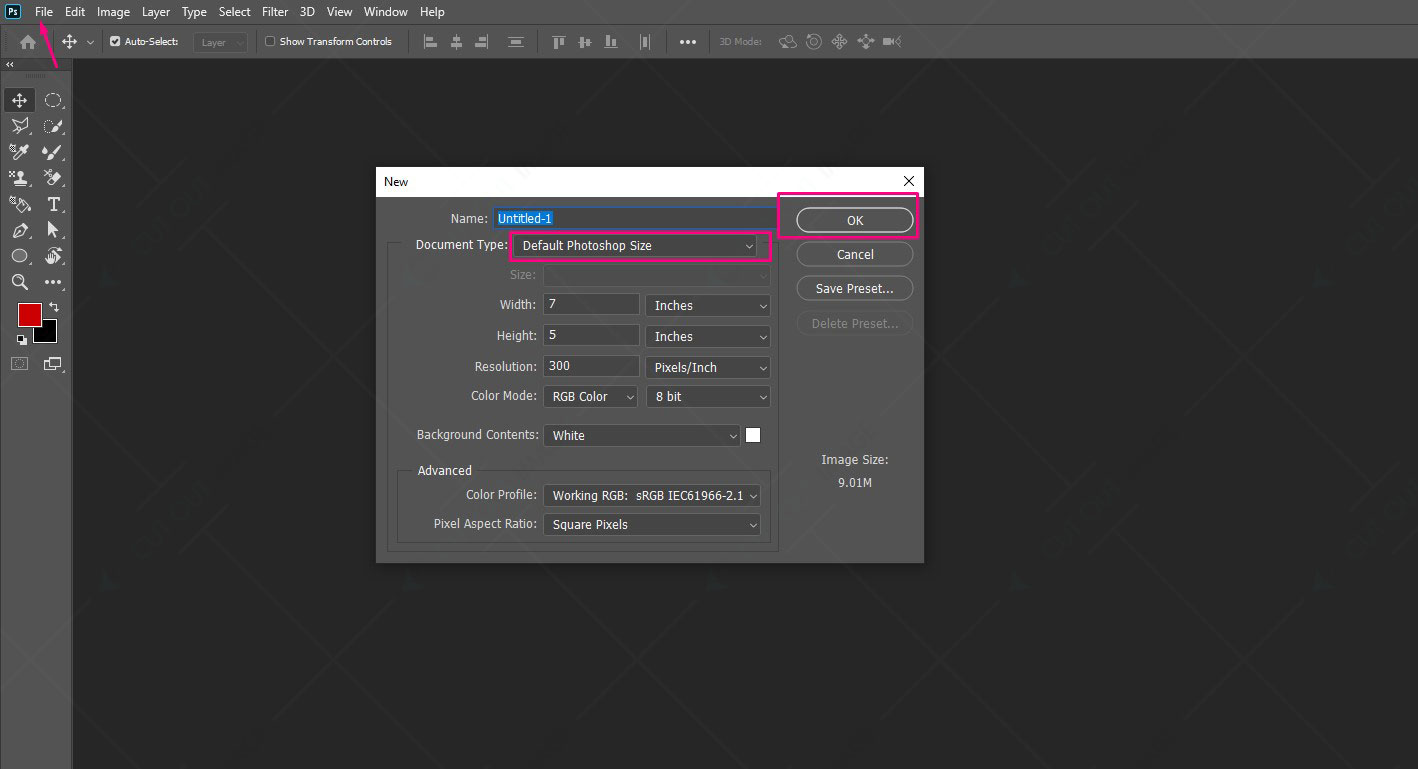
2. Move to the left side’s tool panel. There you will find the gradient tool with a gray gradient square icon. If you can not find it the first time, right-click on the three dots (…), and you will find several tool options. From there, select the gray gradient square icon.

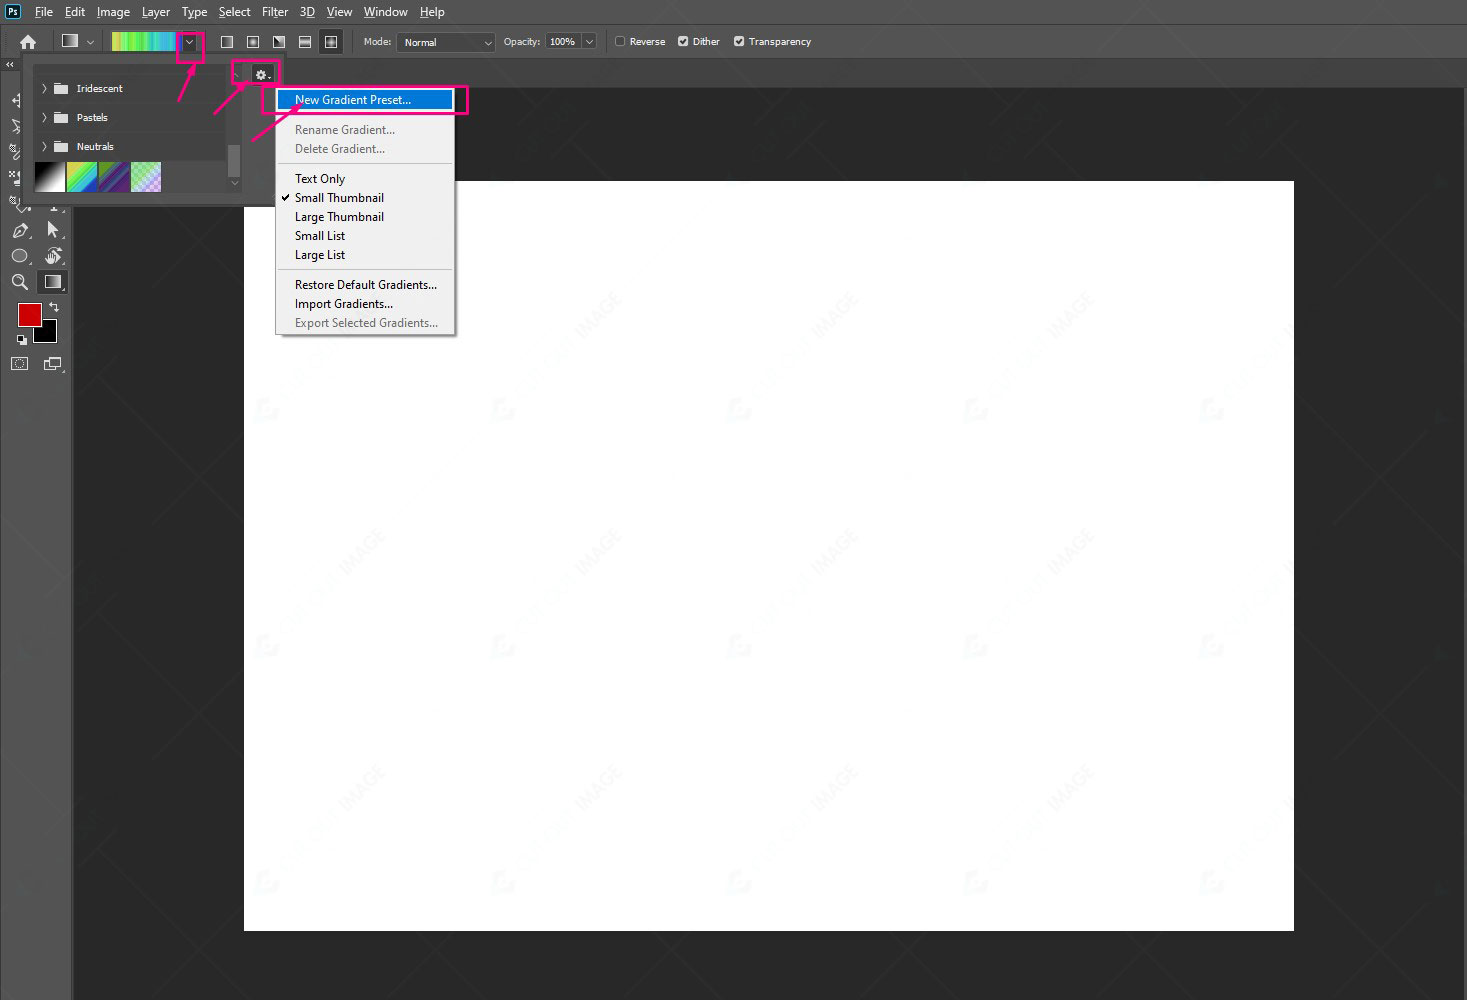
3. Drop down the gradient menu from the upper bar. Now go to the setting option and select New Gradient Preset from the available options.
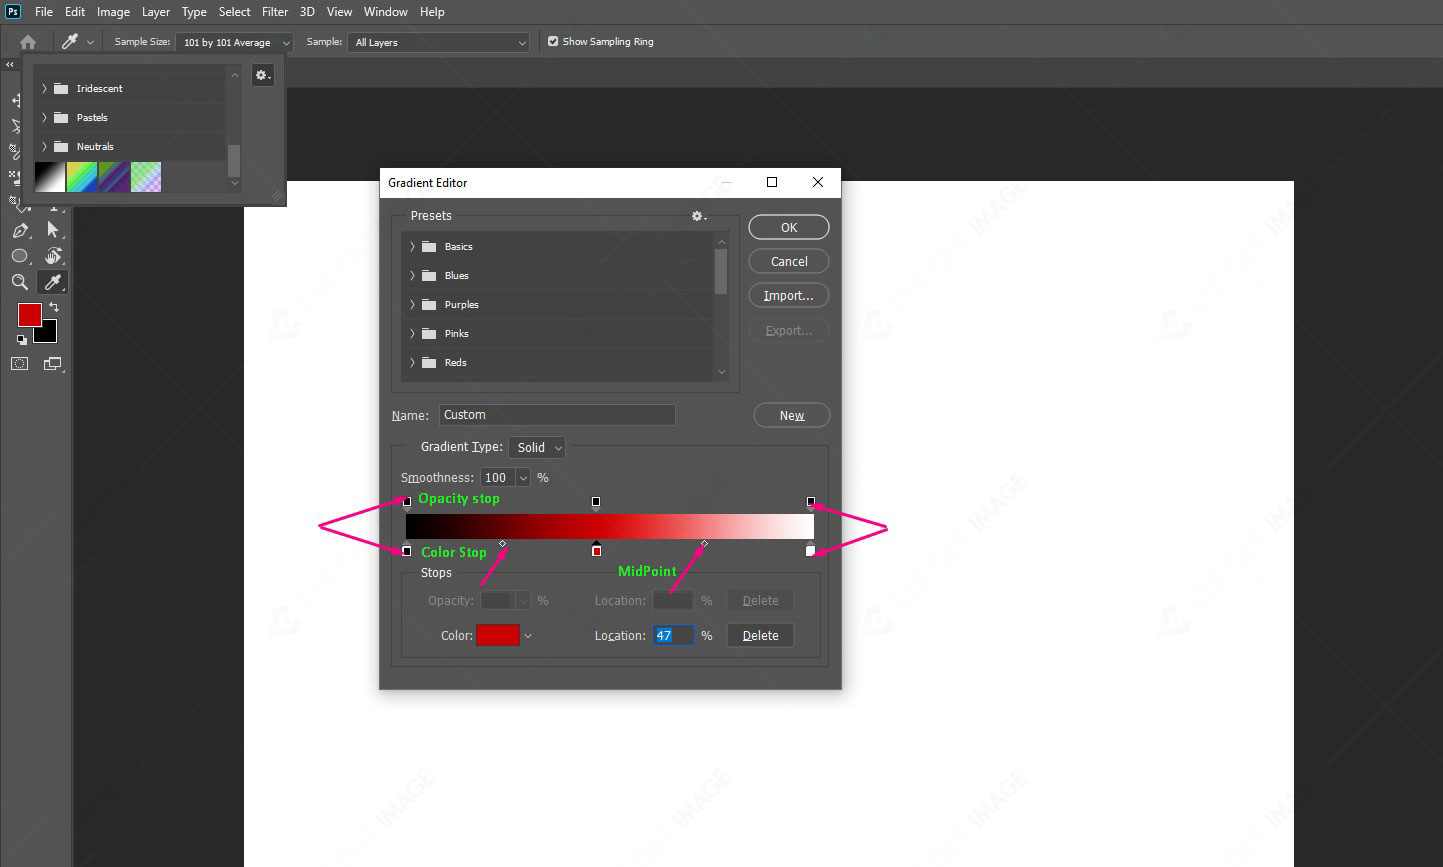
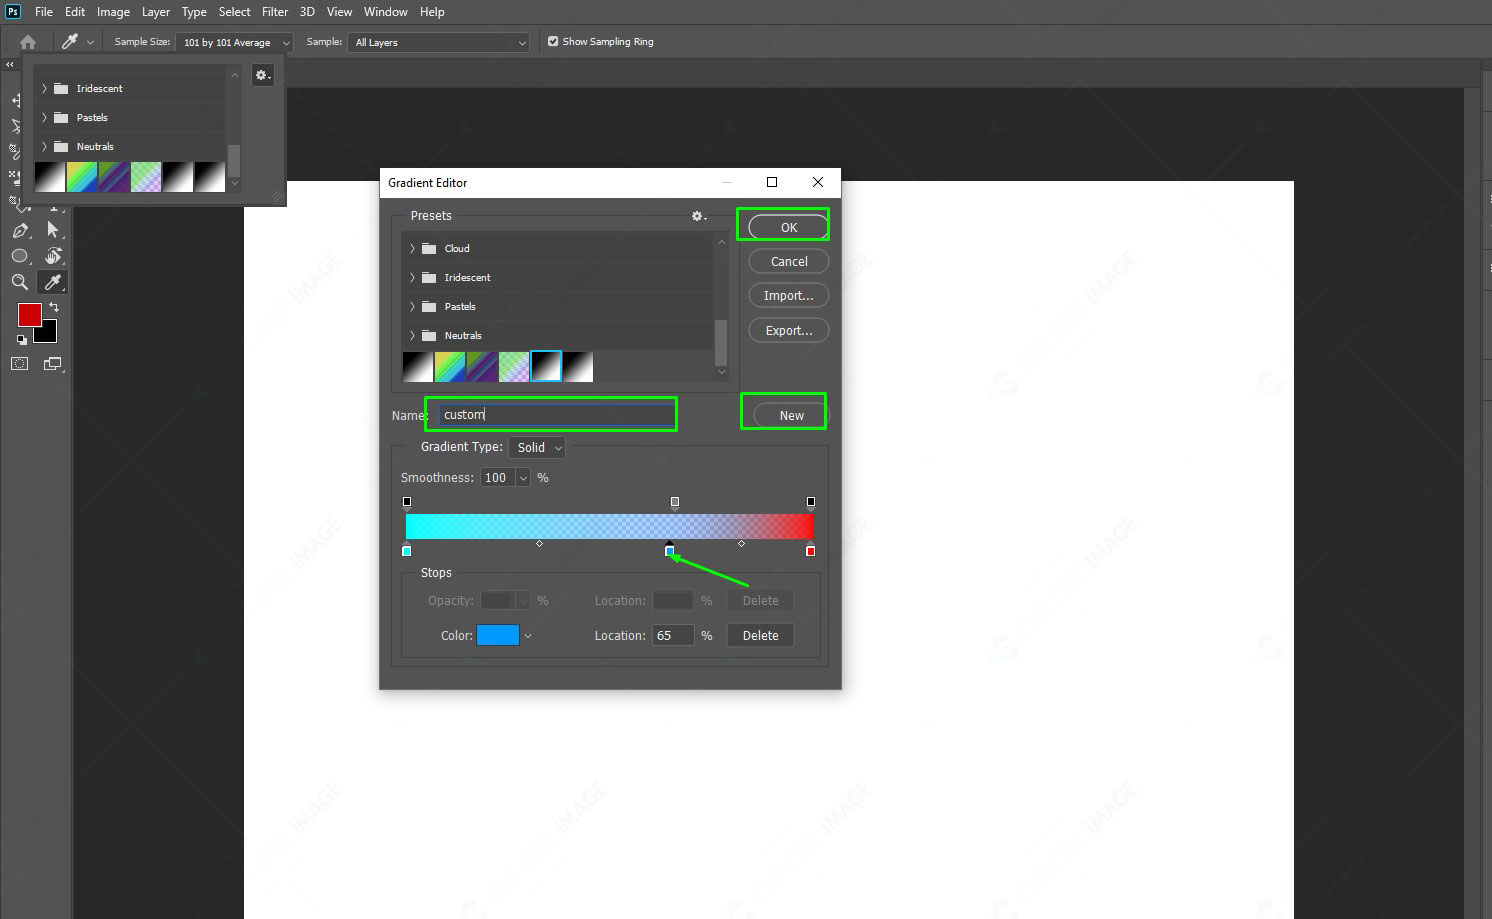
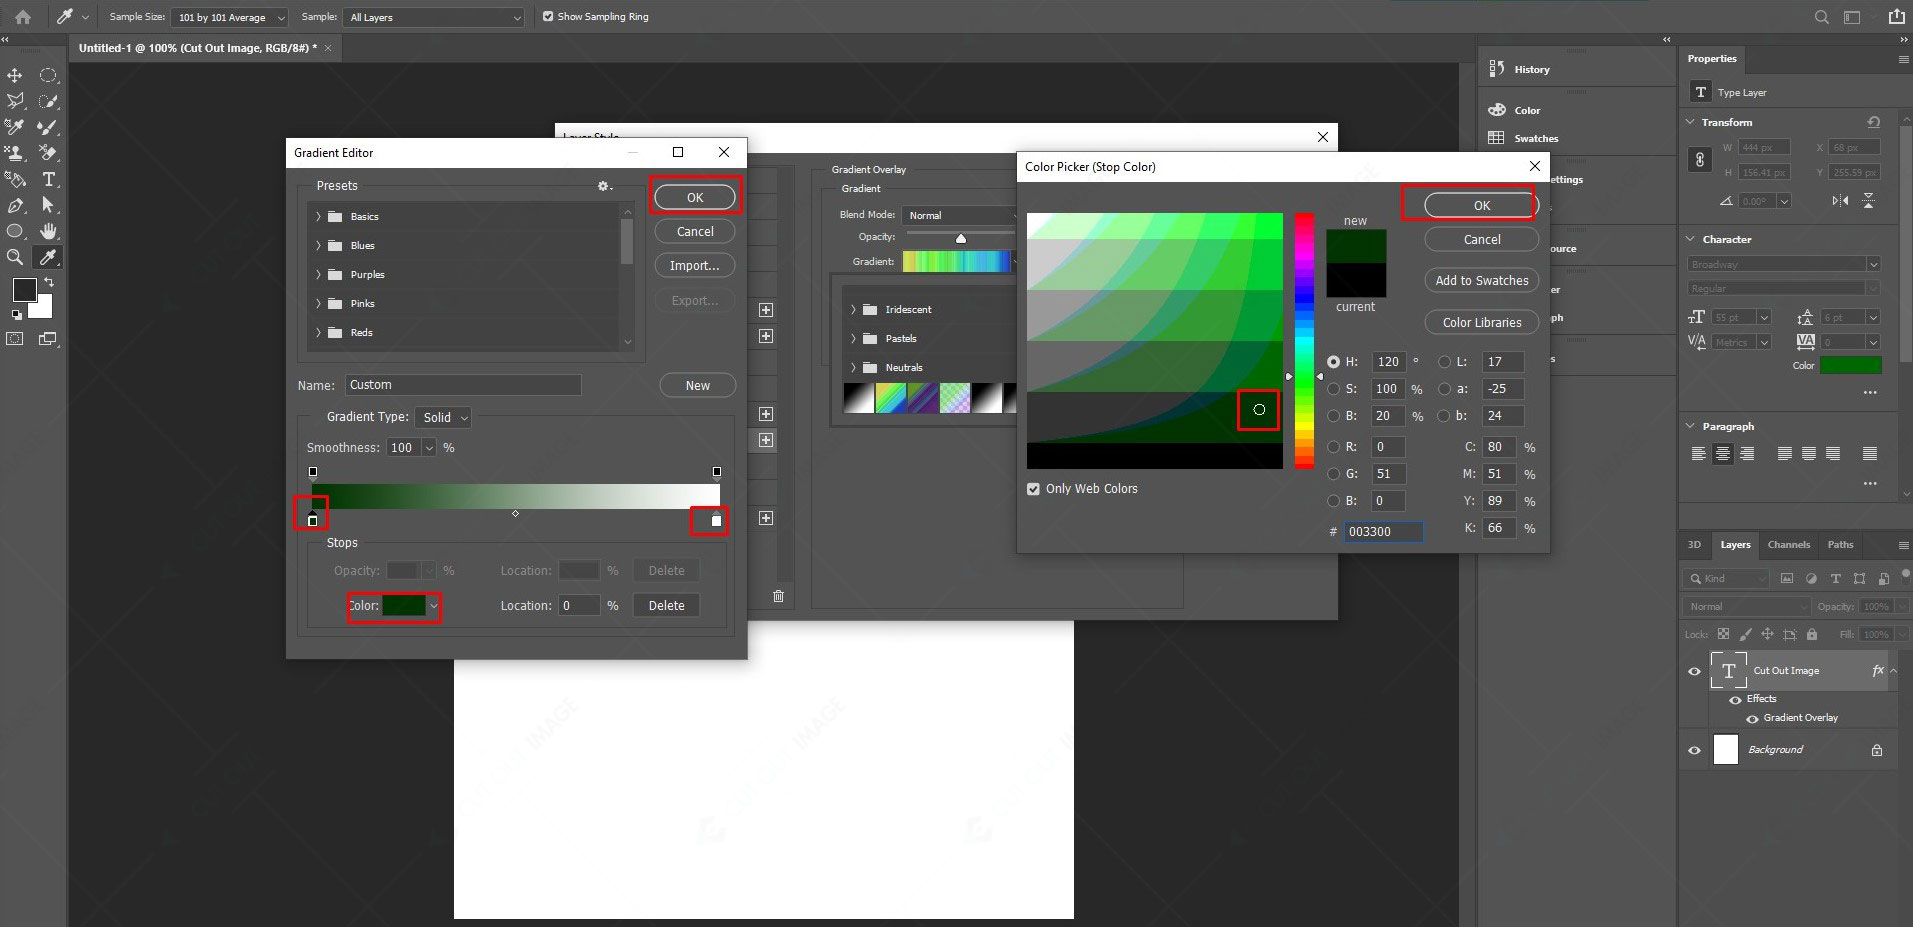
4. A dialogue box will appear containing the color bar and other settings. You will find a few squares above and below the color bar called stops. The upper square sliders are opacity stops, while the bottom square sliders are called color stops. Another square in the middle represents the midpoint for color blending.
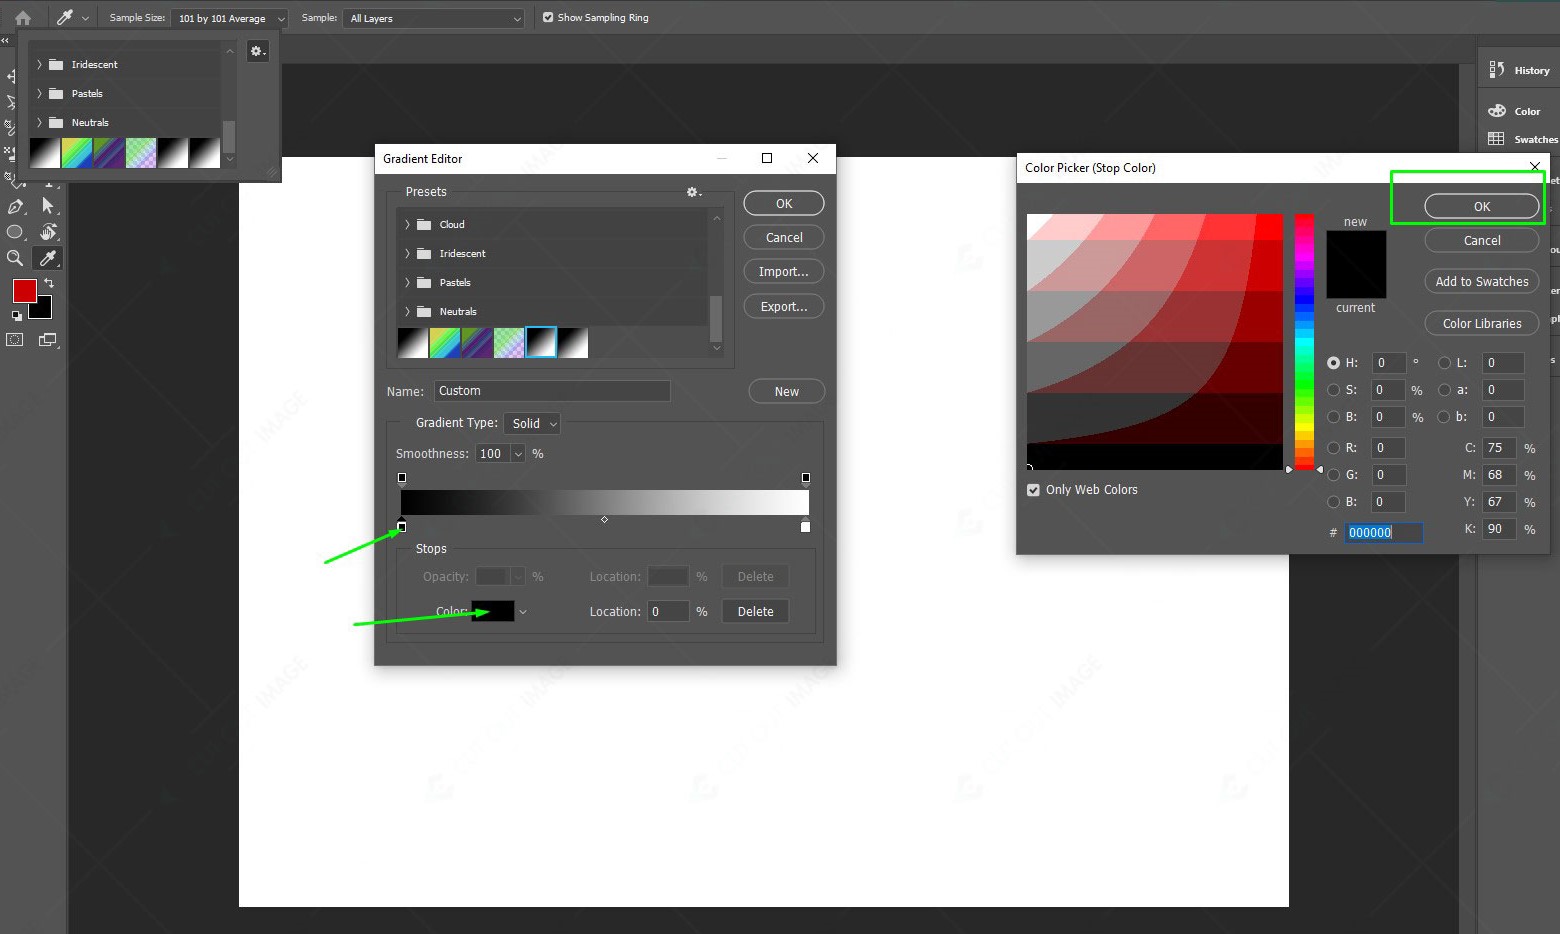
5. Now select the start and end colors for the color stops. You must click the color square and choose a color from the color swatch. After selecting a color, click ok. Repeat the process of choosing to select the ending color.
6. To add more dots for more color, click the area. Here you can add as many dots as you want. After choosing the color, give a name to the Gradient and select New from the right portion to save it. After that, click OK.
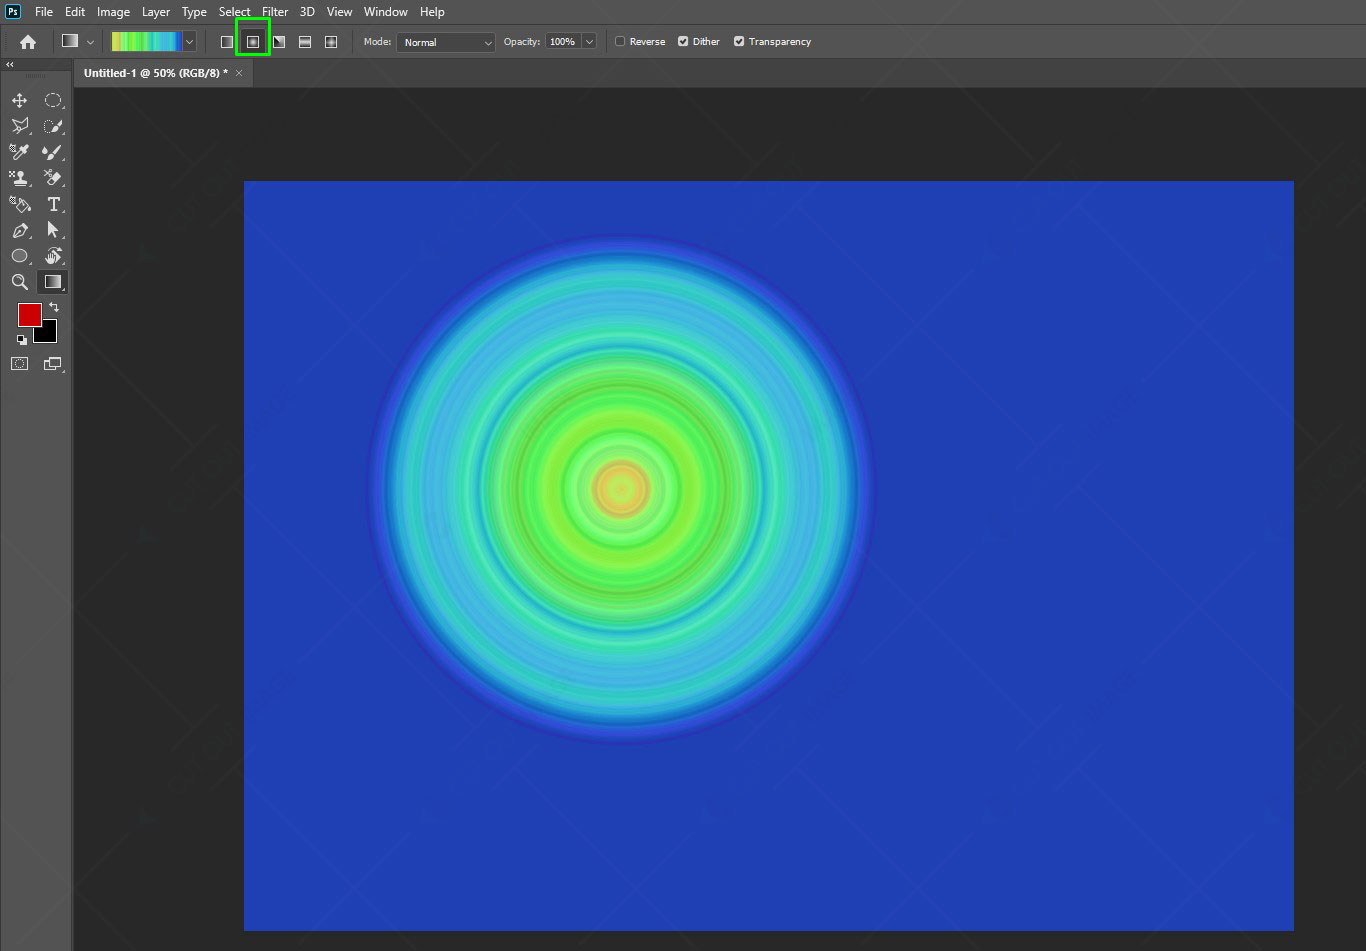
7. Now it’s ready to use. Select any gradient style from the upper bar. Then, click any canvas part and drag it to any other point. You will see the Gradient has been created.
There are quite a several changes possible with the gradient in Photoshop. For instance, you can include multiple gradients, different grades of transparency, and even add the effect on another picture. So, let’s learn a few more modification techniques of the gradient in Photoshop.
Set the Gradient Transparency
Different locations of the gradient contain the opacity setting. For instance, you can set the starting and ending color opacity to 100%, keeping the middle color opacity at 50%. The checkerboard mark denotes the quantity of transparency in the gradient preview. Let’s know how to set the gradient transparency:
- Create a gradient following the steps mentioned earlier.
- Go to the gradient setting, clicking on the gradient bar.
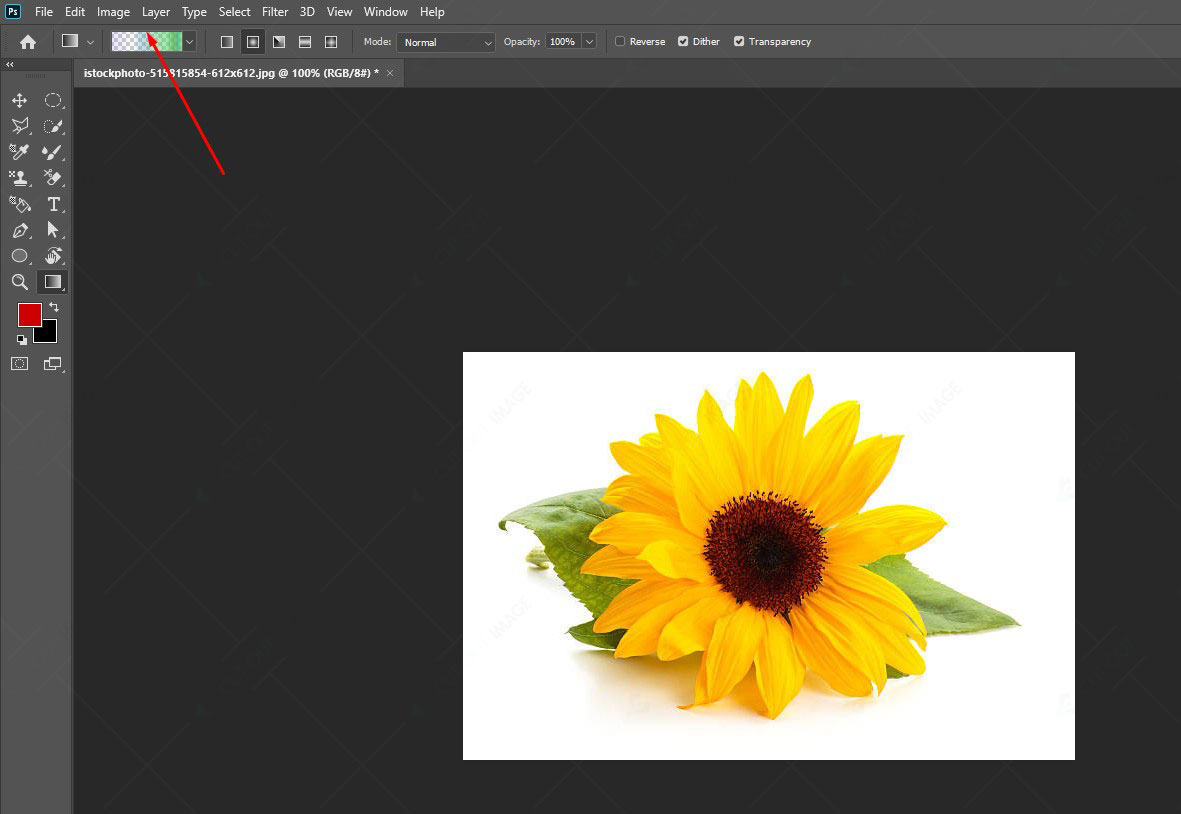
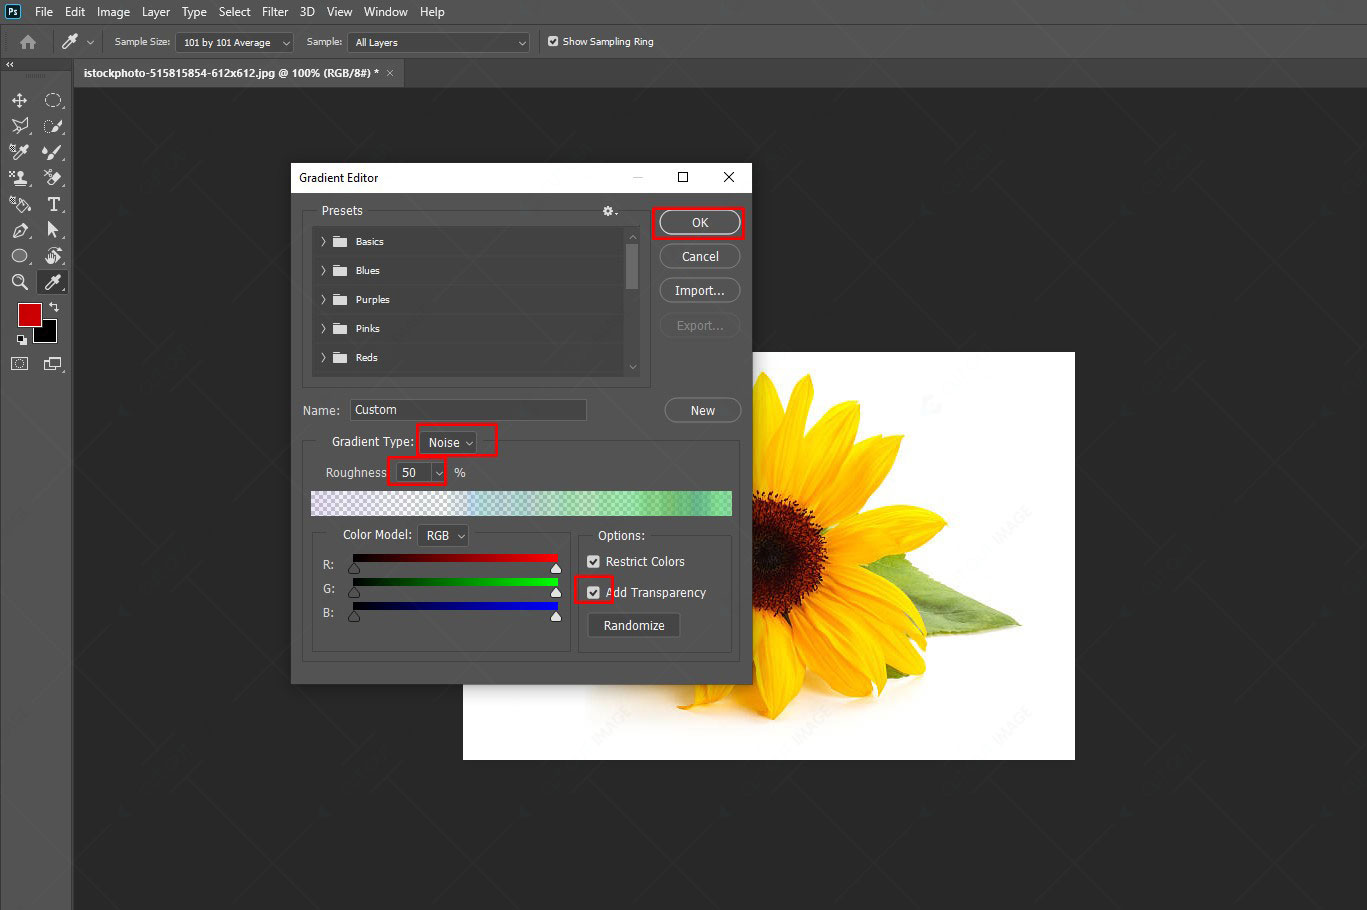
3. Change roughness from the popped-up dialogue box if you use the Noise type gradient and check to mark the Add transparency. After that, click on OK.
4. Now drag and create the gradient.
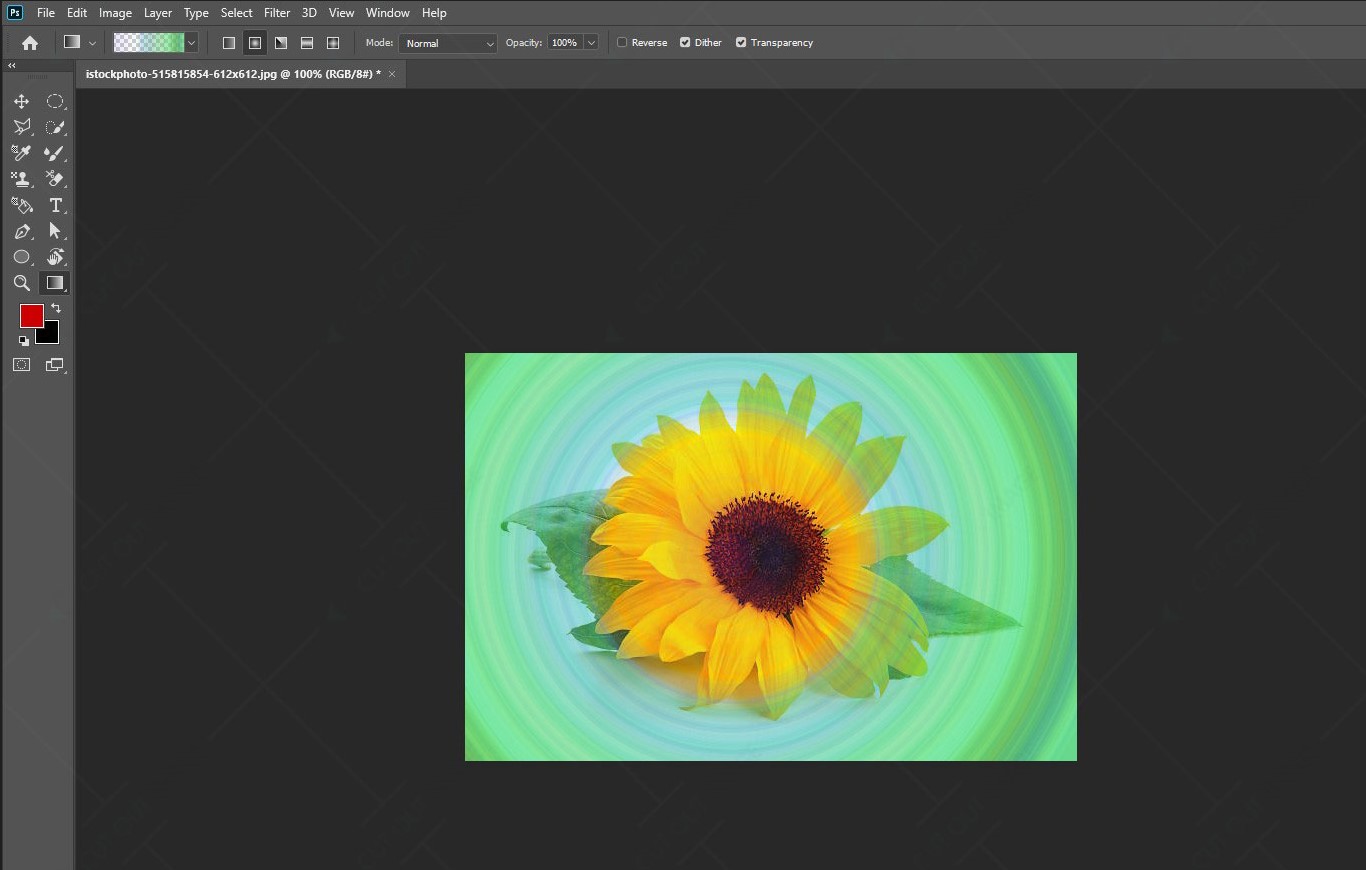
5. If you use the solid gradient, go to the slide bar and change the start, mid, and end opacity points. After changing the value, click OK.

6. Now drag and create the gradient.

Create Gradient Over the Photo
Let’s learn now how to apply a new gradient to a picture.
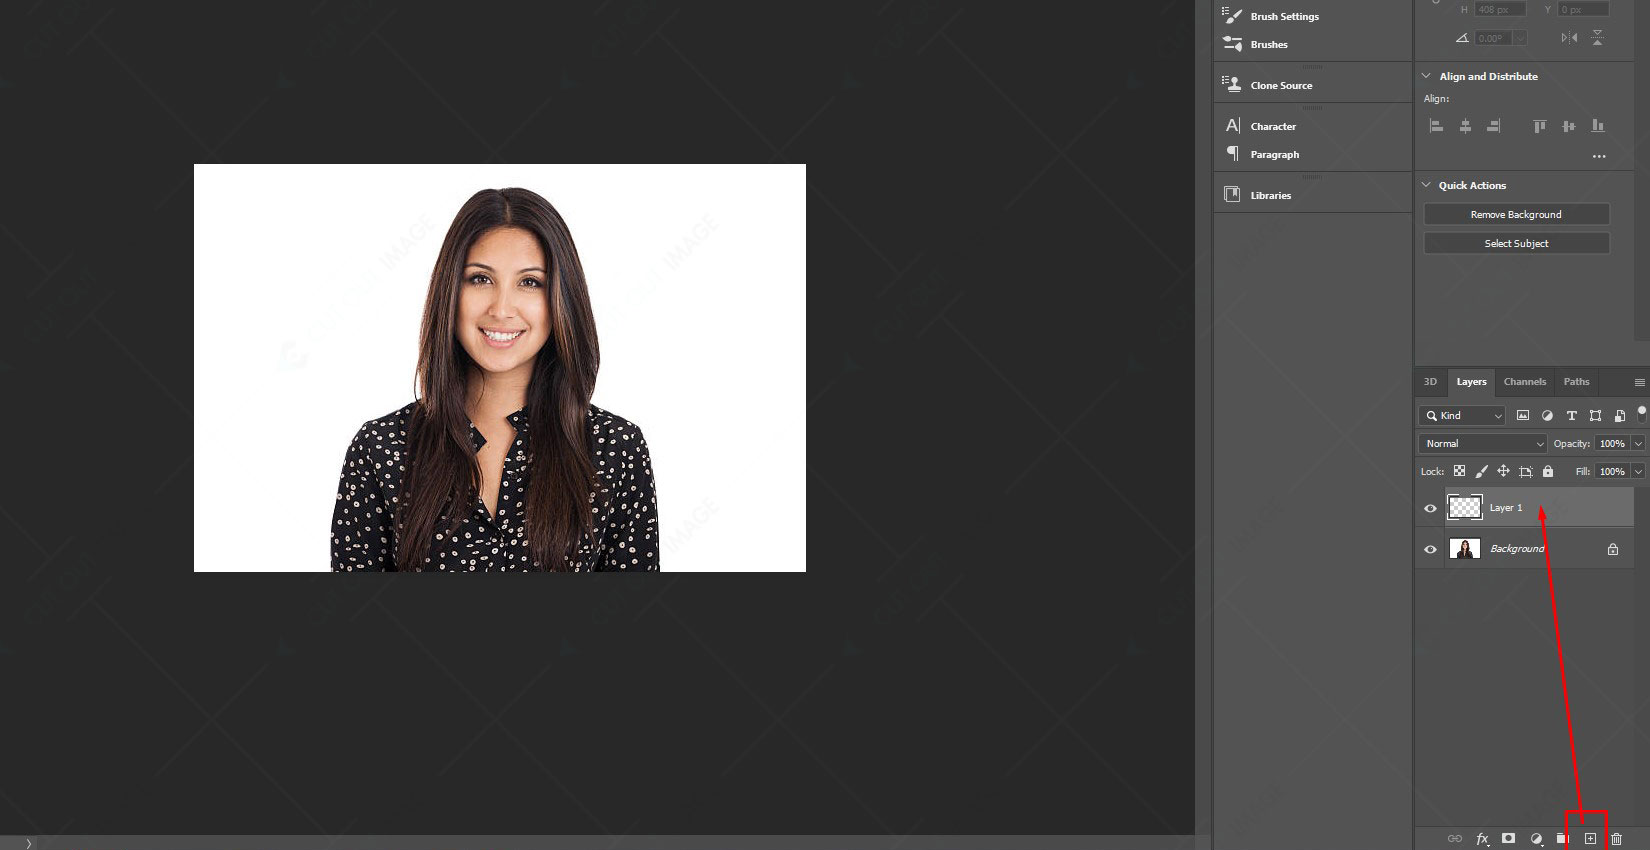
- Open a photo in photoshop and create a layer by clicking on the plus sign (+) from the below panel.
2. Now open the gradient tool from the left side panel.
3. Go to the setting option to set the color and opacity. Then click OK.
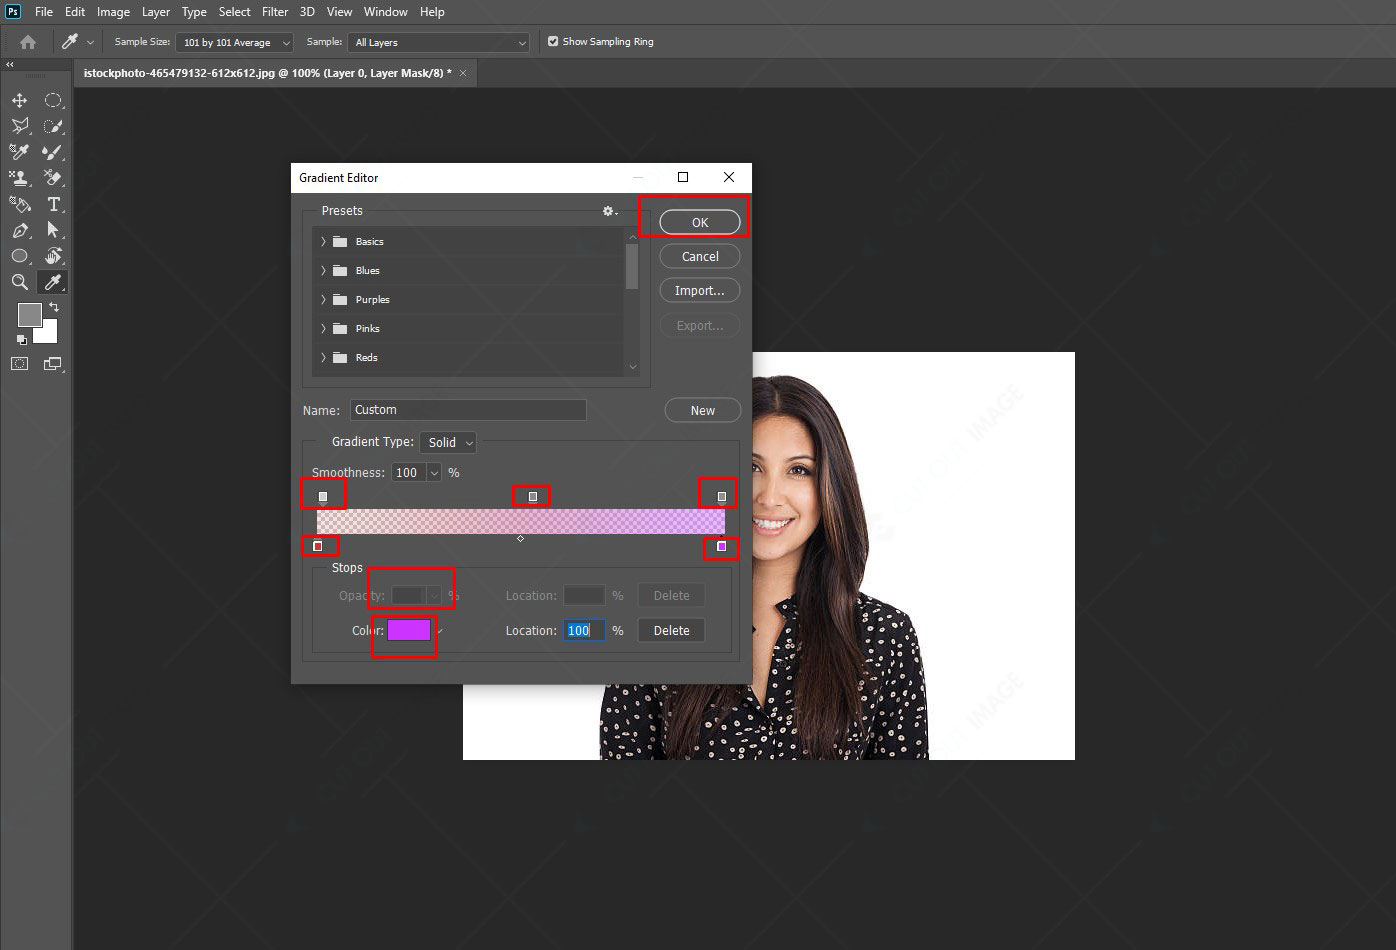
4. Check to mark the Transparency and unmark the Reverse.
5. Now select a gradient style and click and drag to create a gradient over the picture.
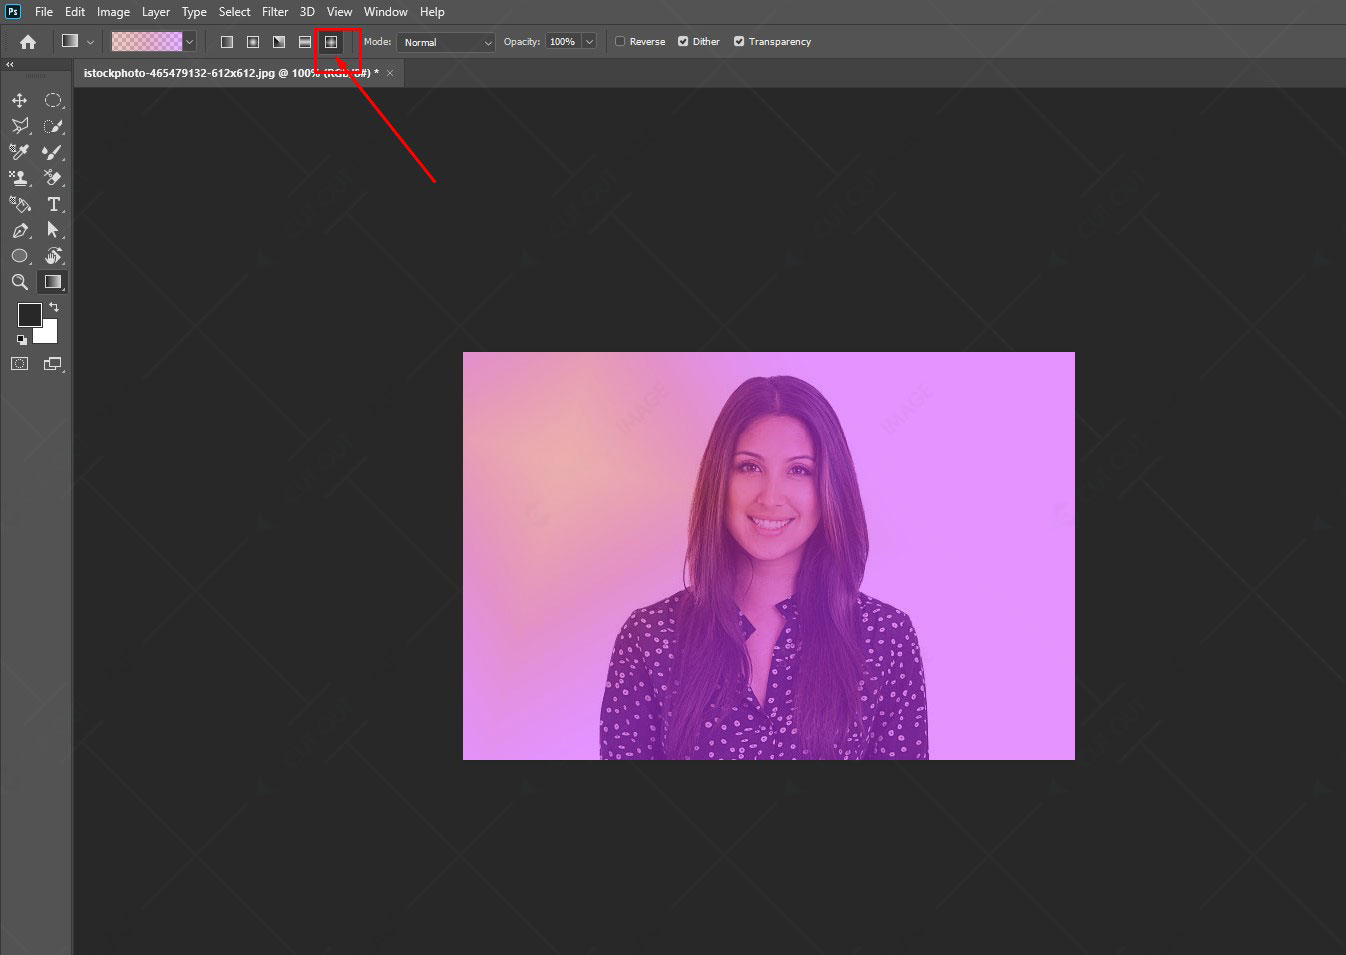
6. To modify the blending, double-click on the active layer or, selecting the layer, click on the fx from the below part. Then, from the available options, choose Gradient Overlay.
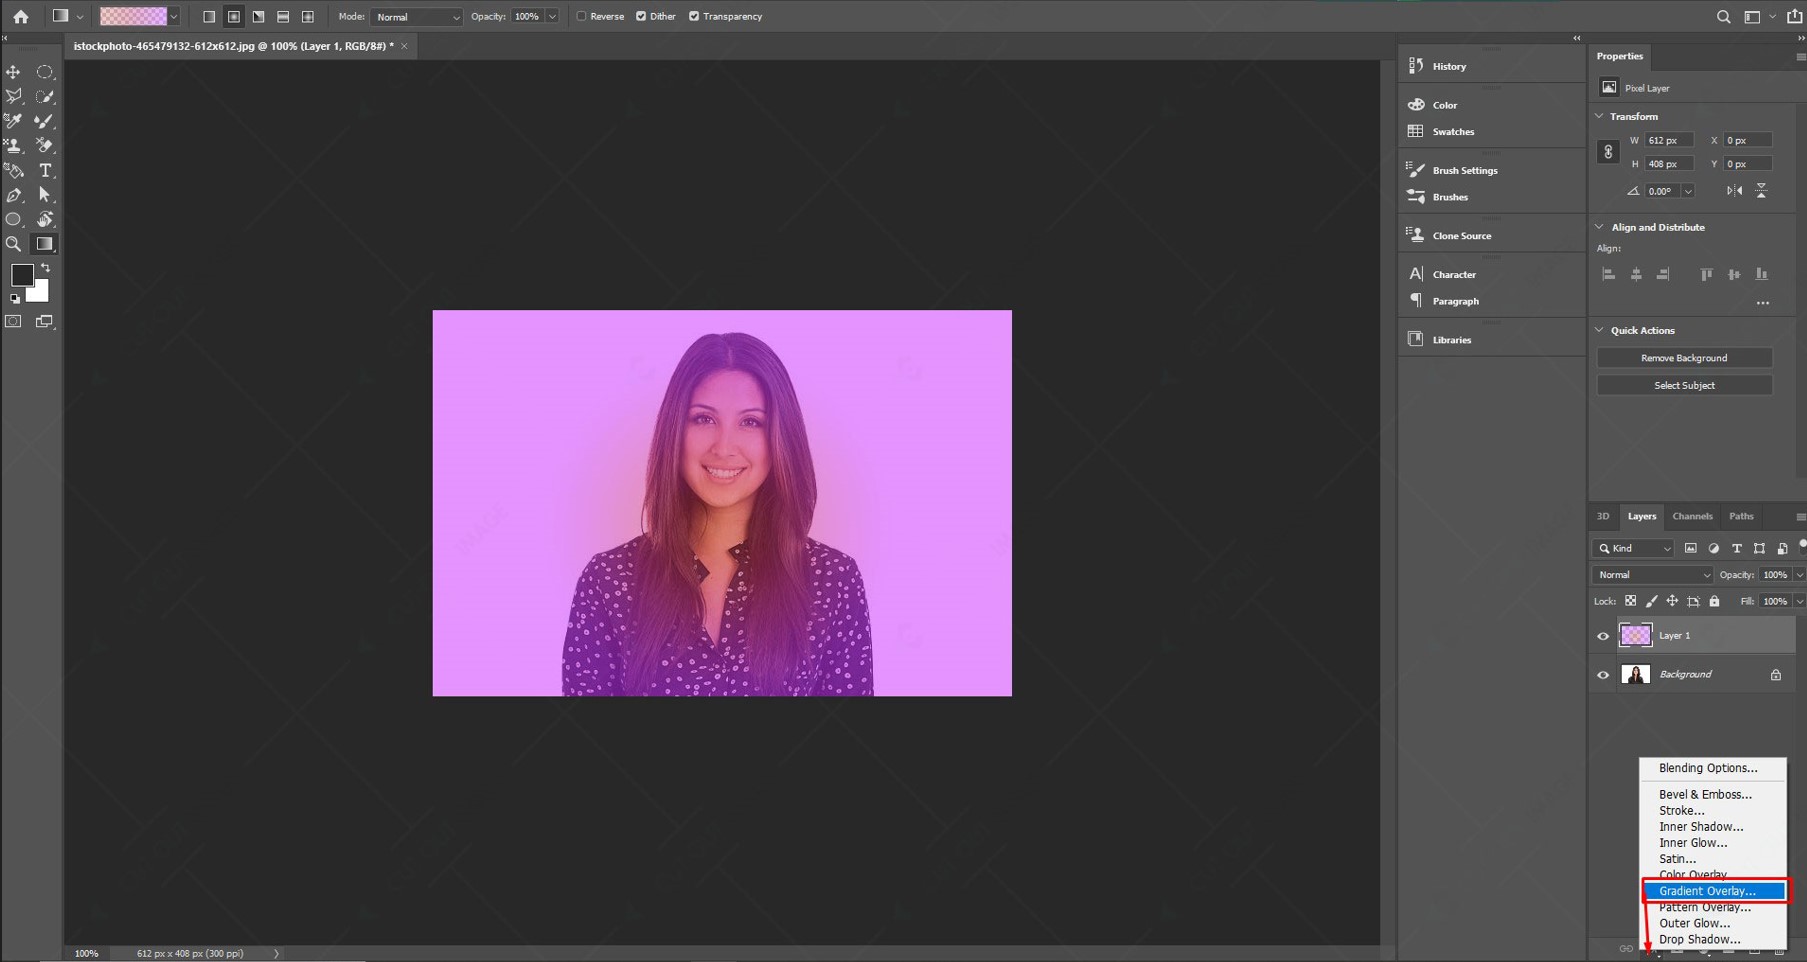
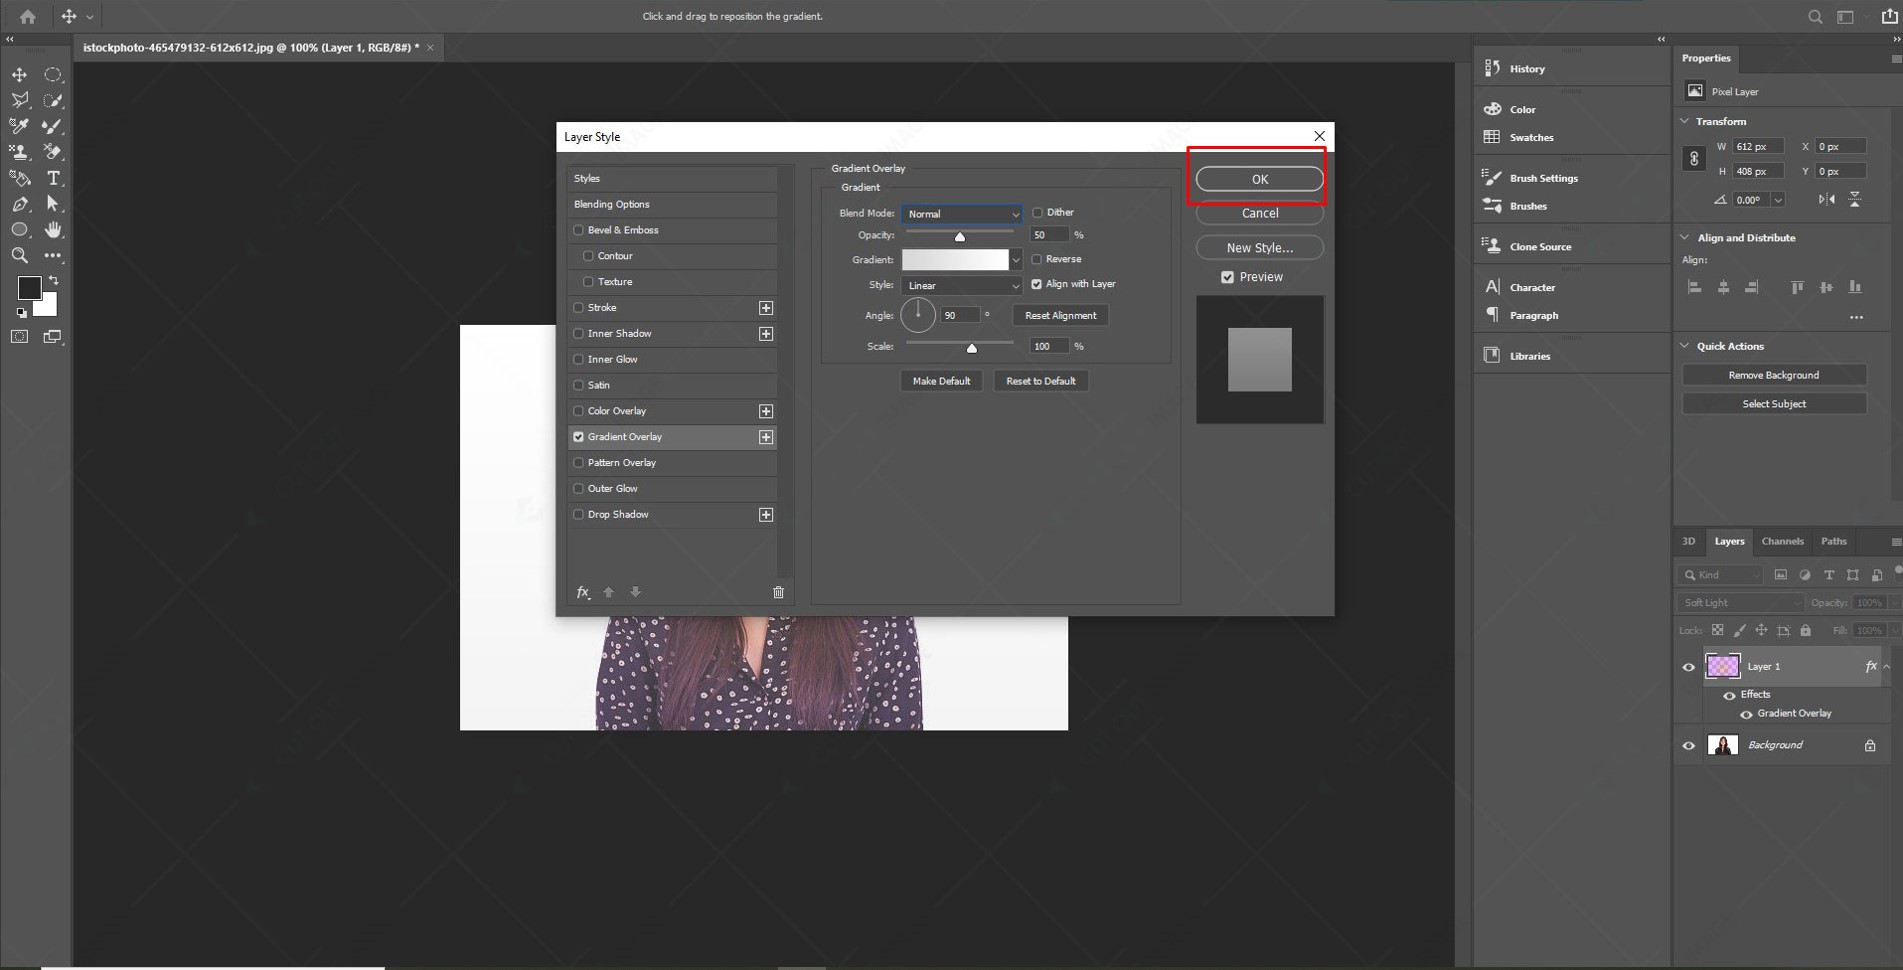
7. A pop-up will appear and click OK to close the pop-up.
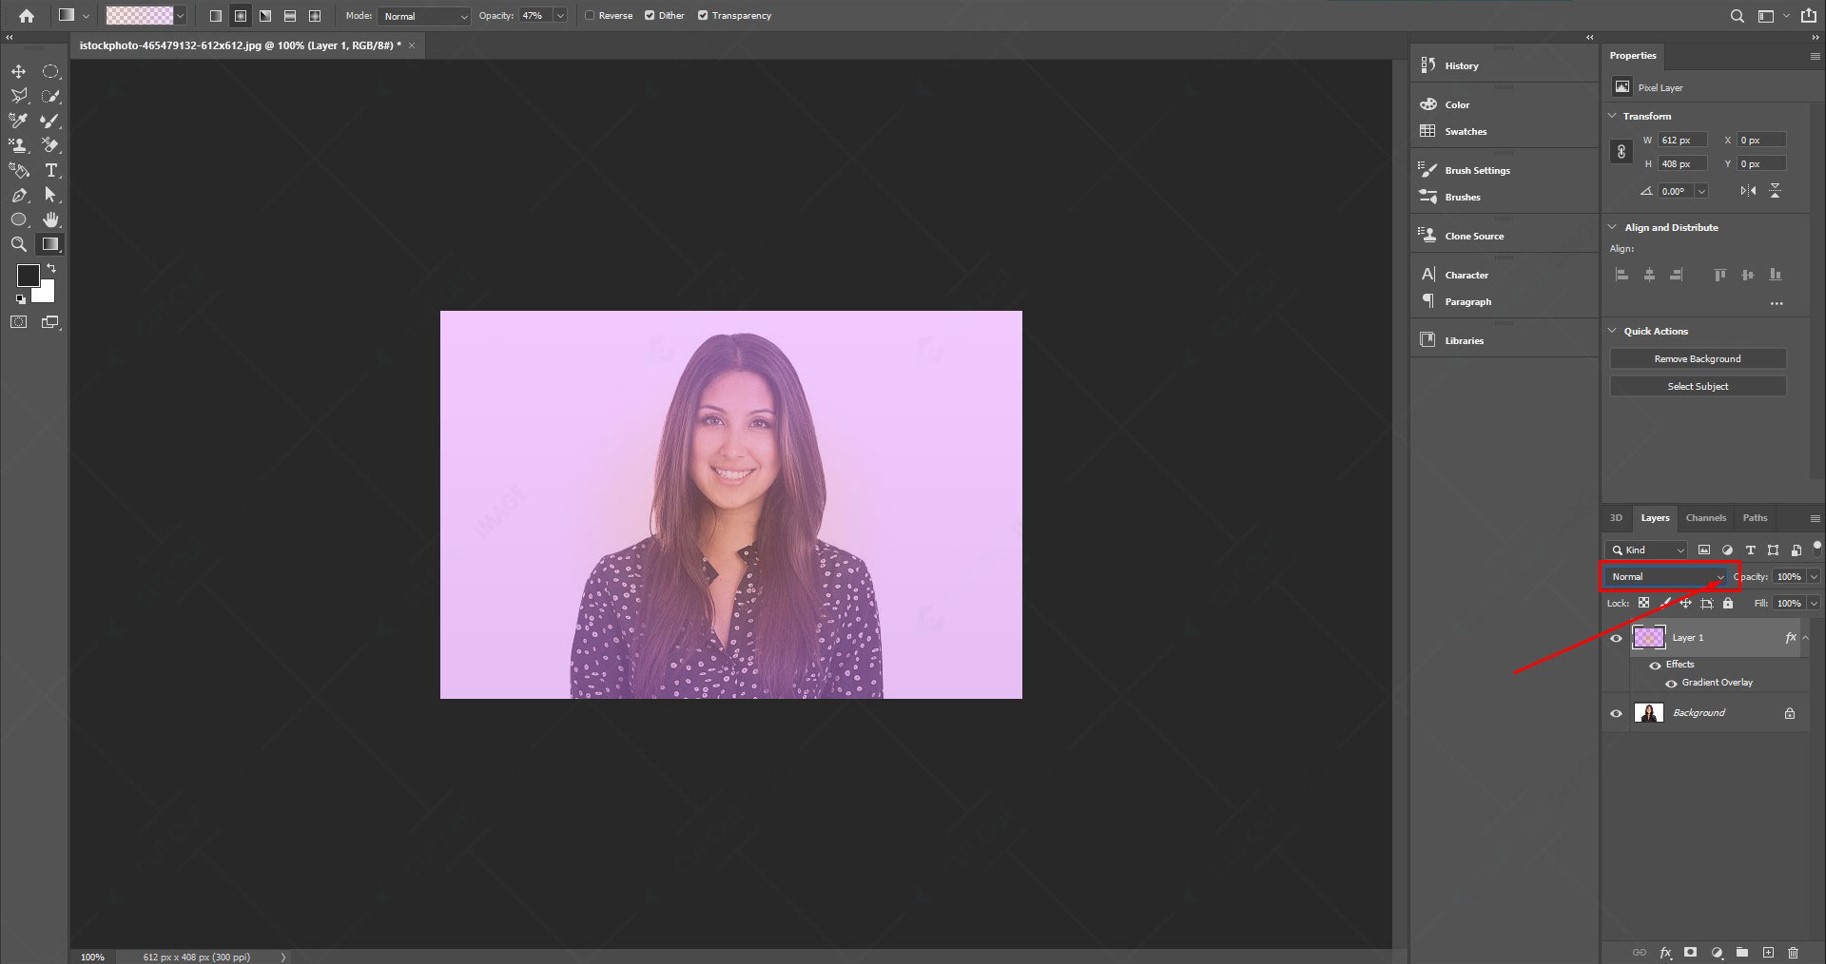
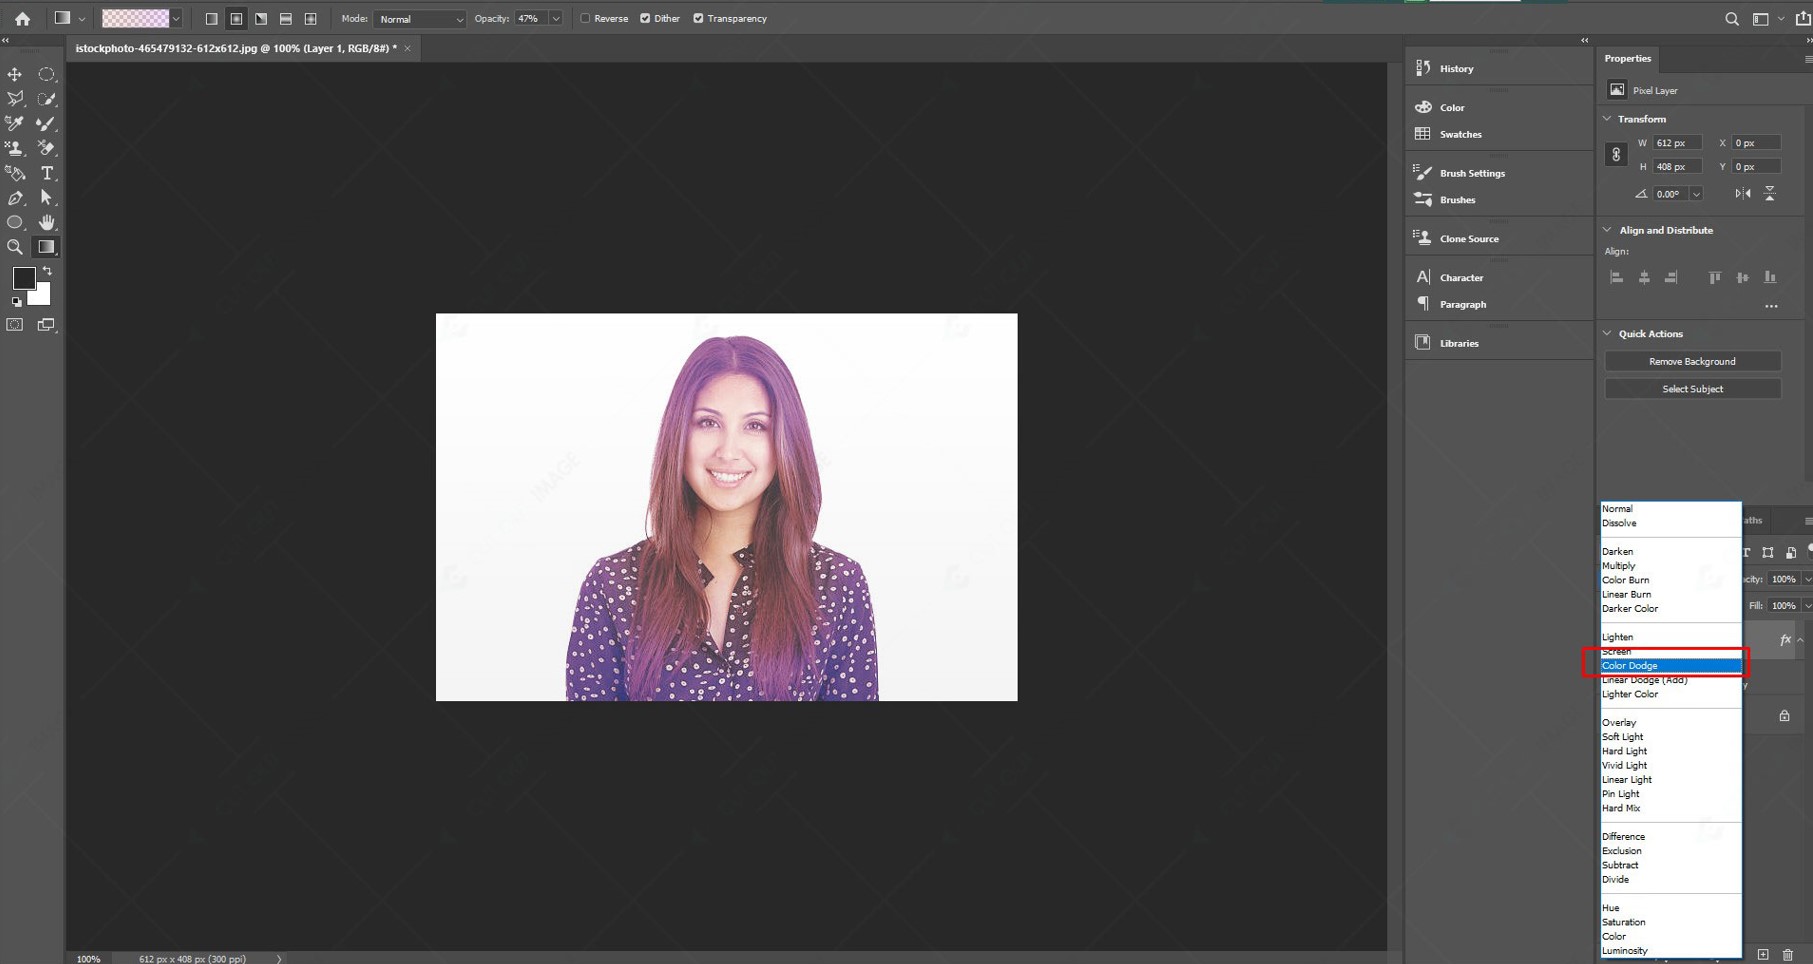
8. Now play with the blending mode and select the mode that you prefer.
Create Gradient Text ( How To Create a Gradient in Photoshop )
Did you ever create gradient text before? If not, this part of the blog will help you spice up the font of your text. You can do it in different ways using Photoshop. Here I am going to share the easiest one. Follow the below-mentioned steps to create gradient text:
- Open Photoshop and create a blank canvas.
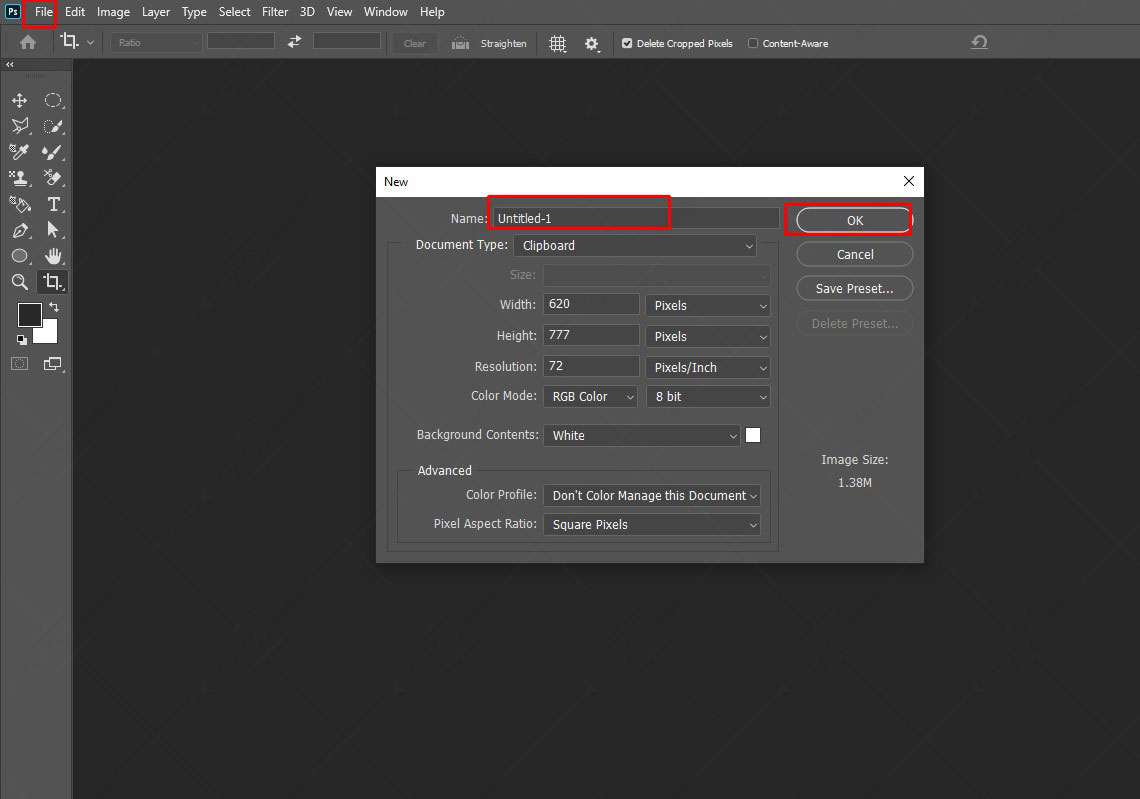
2. Go to the Text Tool from the left side panel or press T on your keyboard.
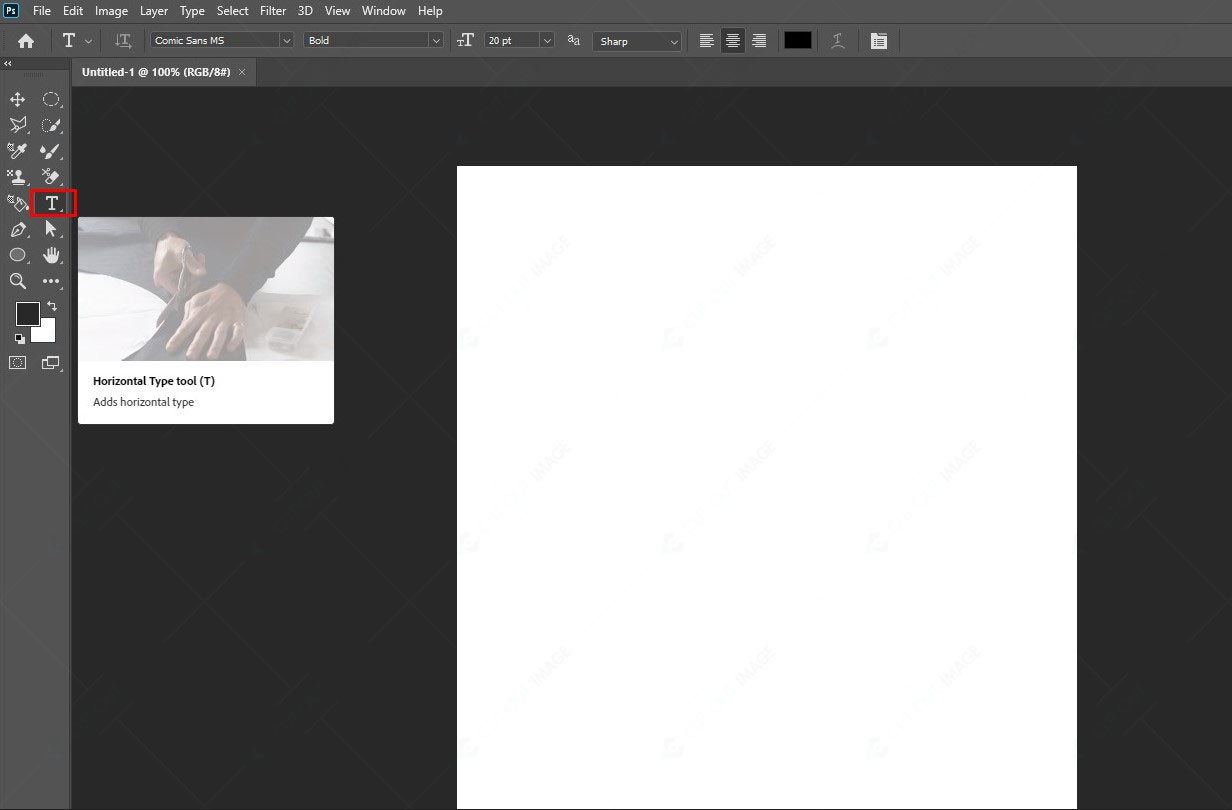
3. In photoshop, writing text is different from other word documents. Here you have to click on the canvas to create a text space. Once you create a text space, it creates a new text layer in the layer panel.
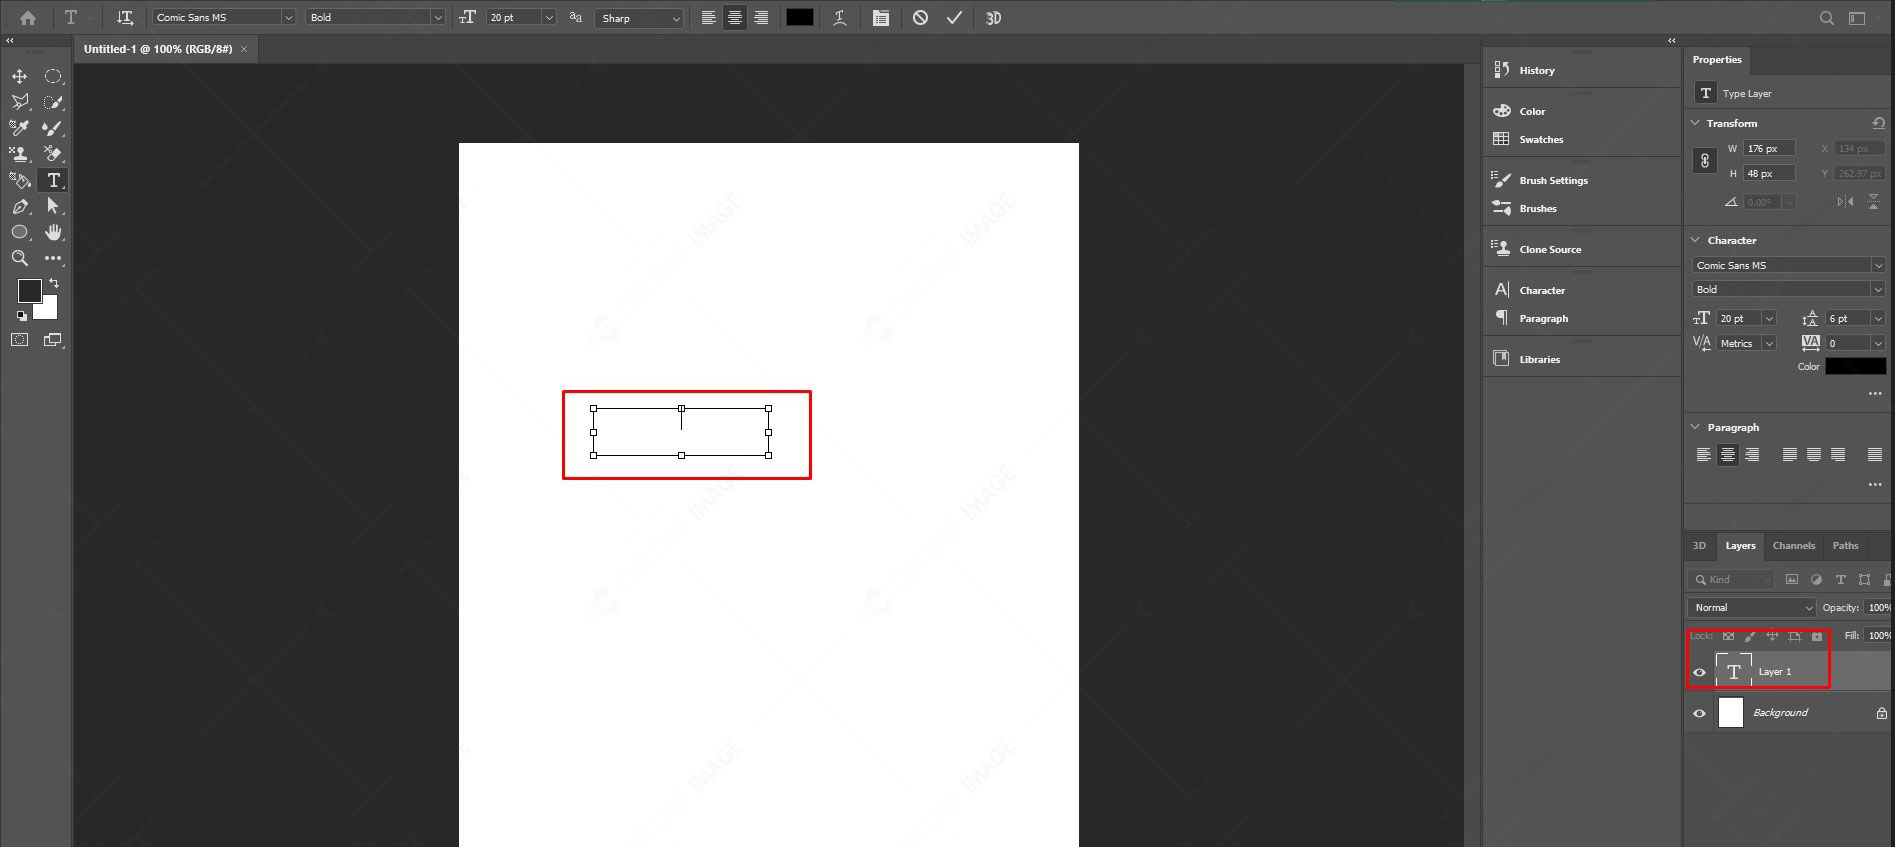
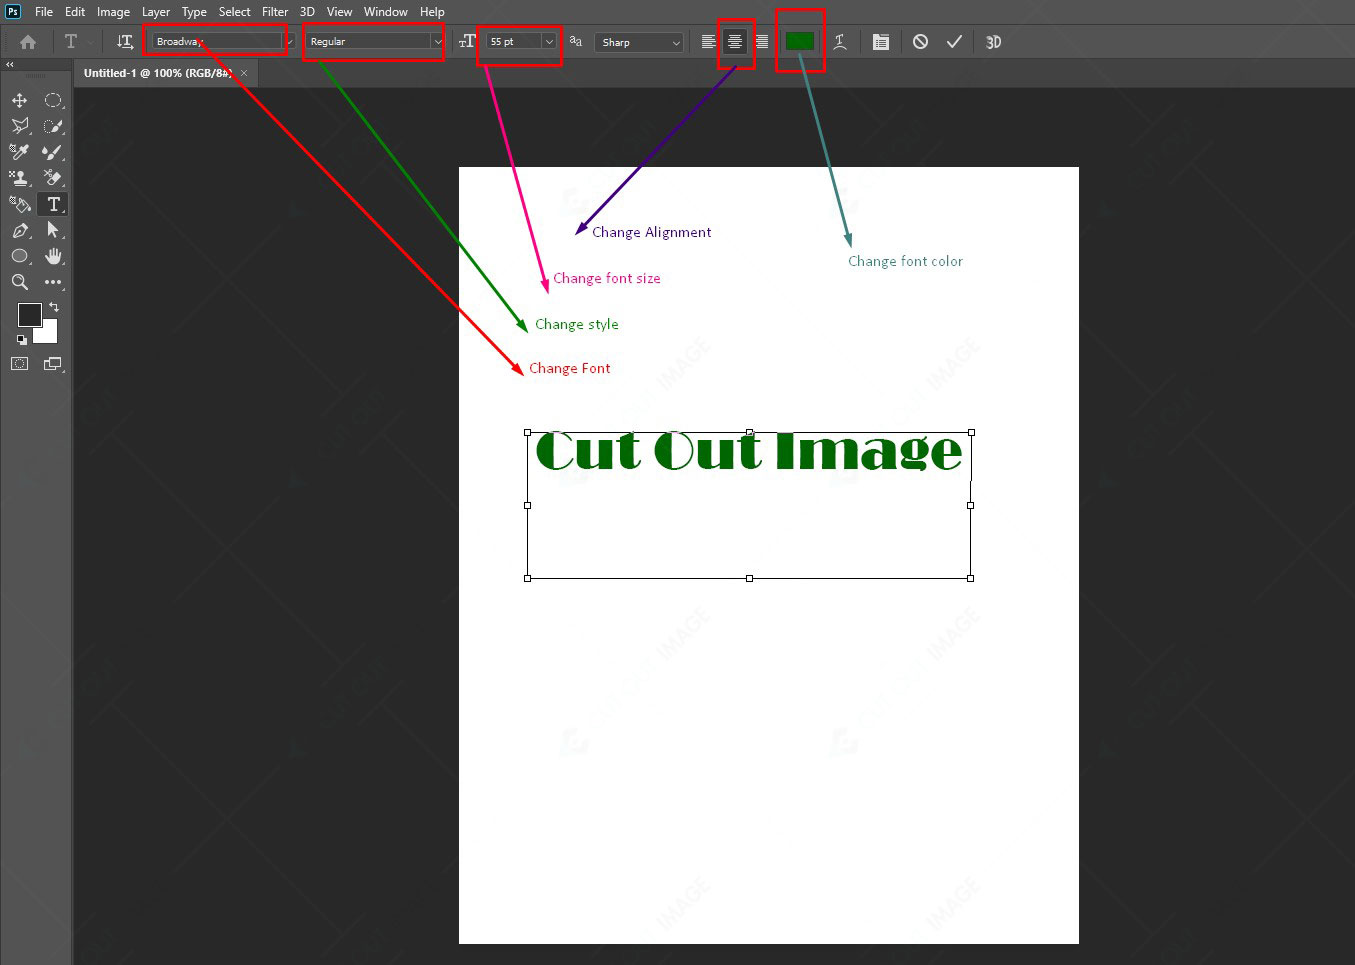
4. Write whatever you want and change the font, color, and style by going to the upper settings bar.
5. Now select the text layer and go to the Add a layer style (fx) from below. Then select the Gradient overlay. A pop-up will appear with a gradient setting. From there, click on the setting icon and select New gradient preset.
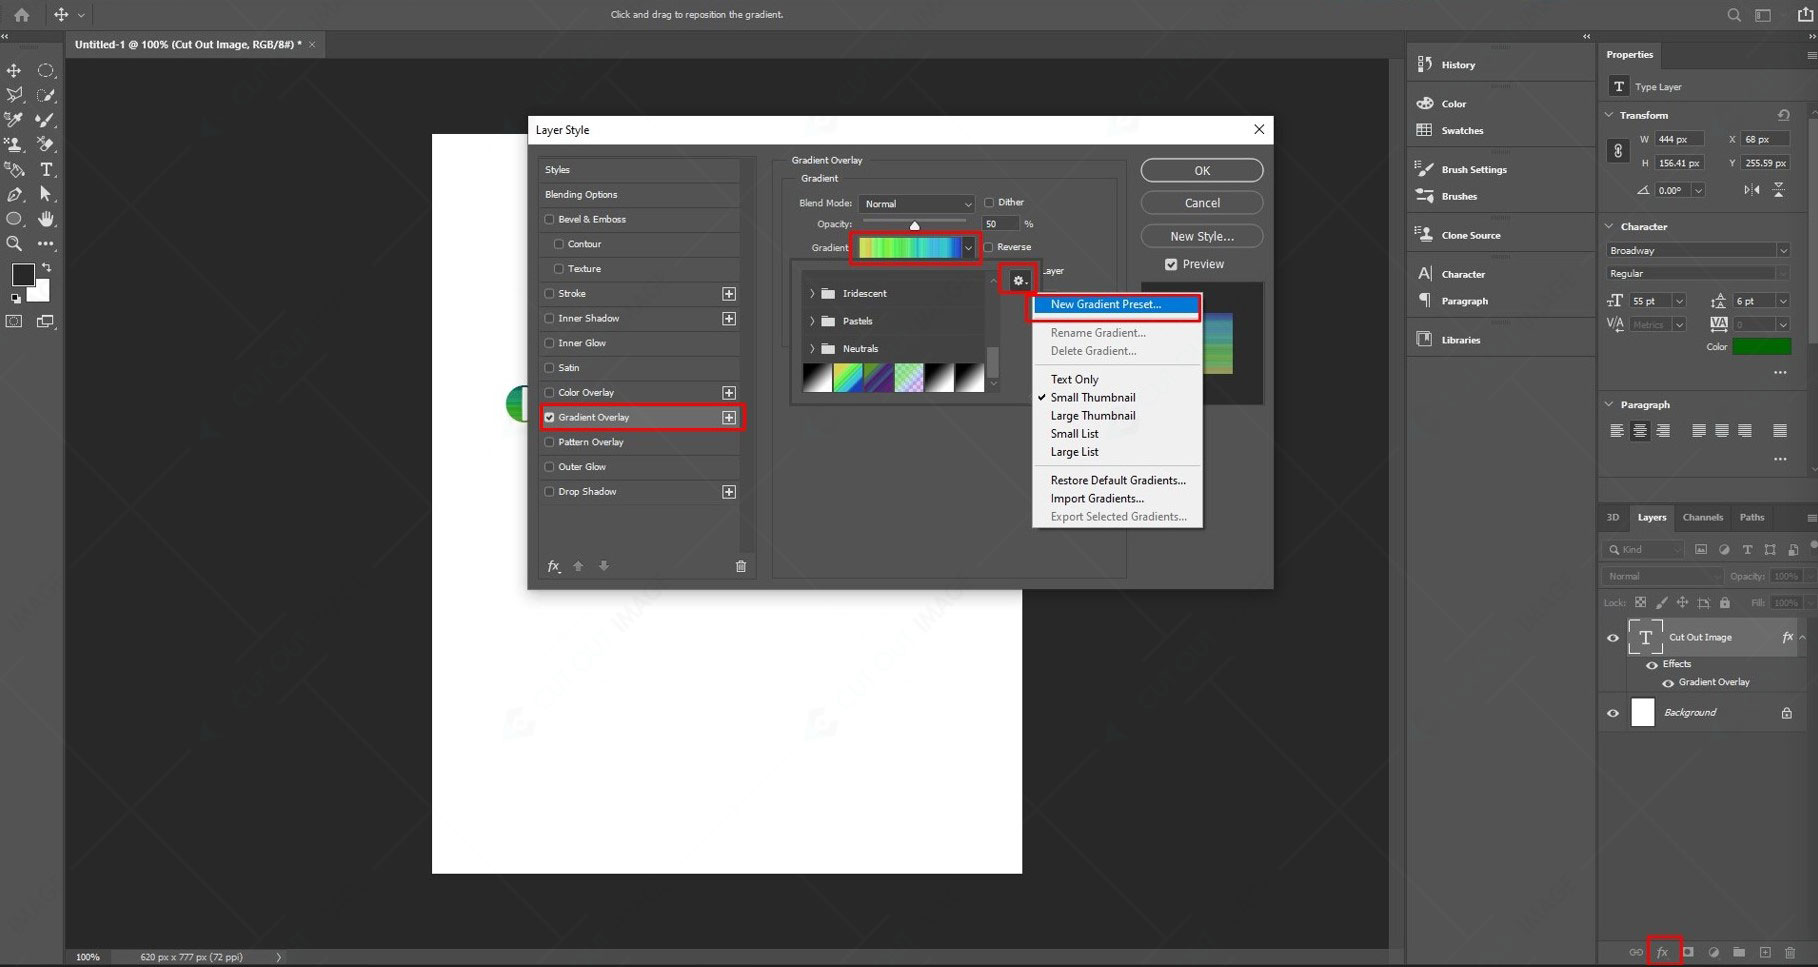
6. Another pop-up with setting options will appear. Now select the start, mid, and end colors for your text and click OK.
7. Again go to the Gradient Overlay from layer style (fx). Now set the blend mode to Normal, keeping the Dither check marked for the smooth gradient. Change the opacity but keep it 100% for the best result. You also can change the angle and gradient style according to your preference. Then click OK.
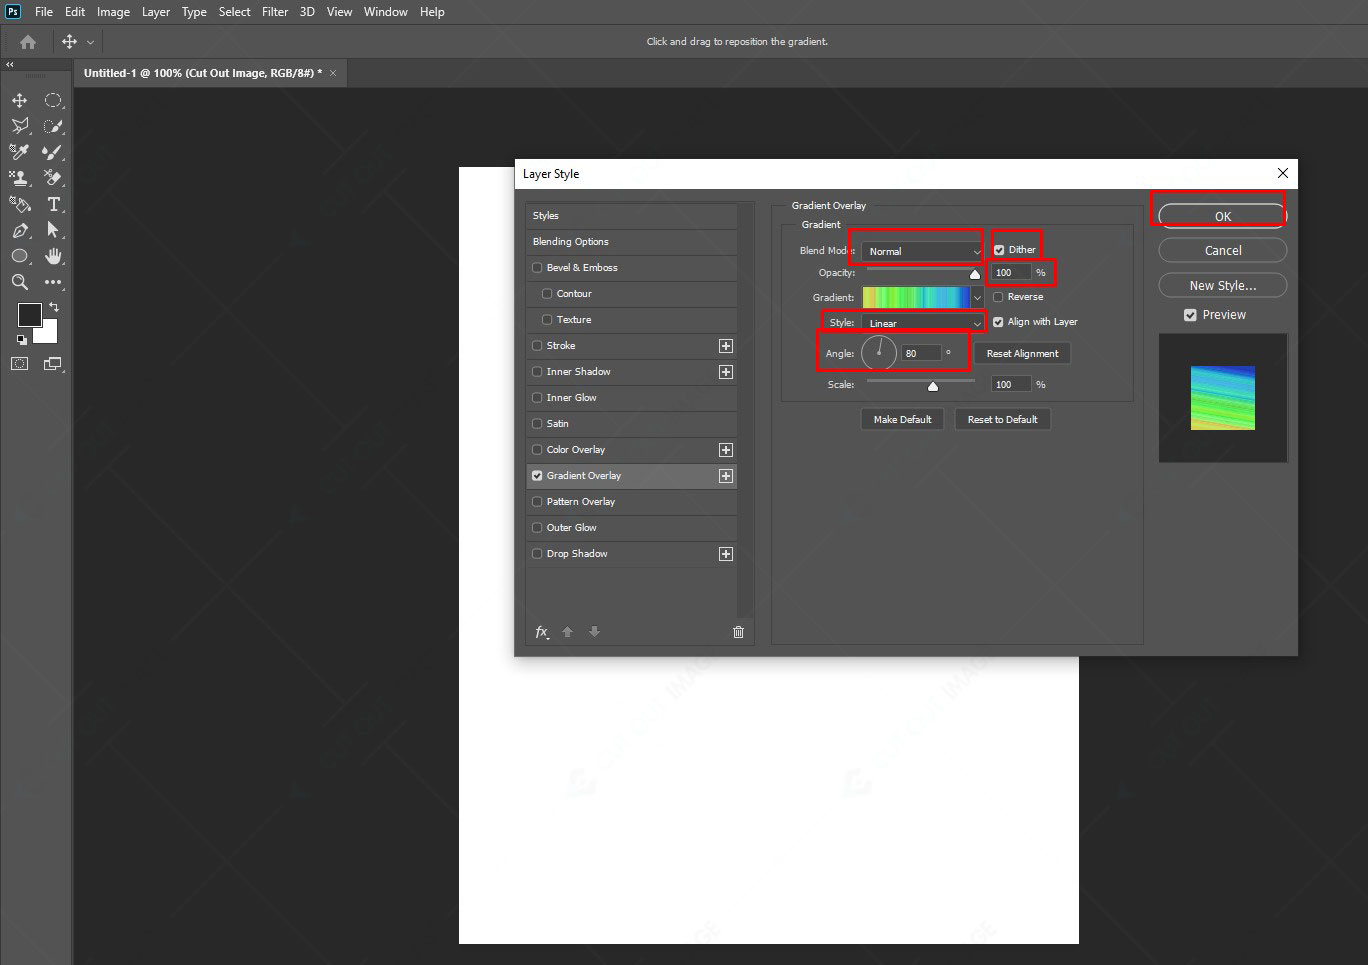
8. The gradient with the setting has been applied to your text. You can modify it by repeating the above steps.

Tips for creating the best Gradient in Photoshop
Applying the mentioned steps can’t help you generate the best Gradient in Photoshop. Moreover, you need to apply a good range of colors. You can take an idea from uiGradients which provides more than 260 linear gradients for design with code. Here is some sample color for your understanding:
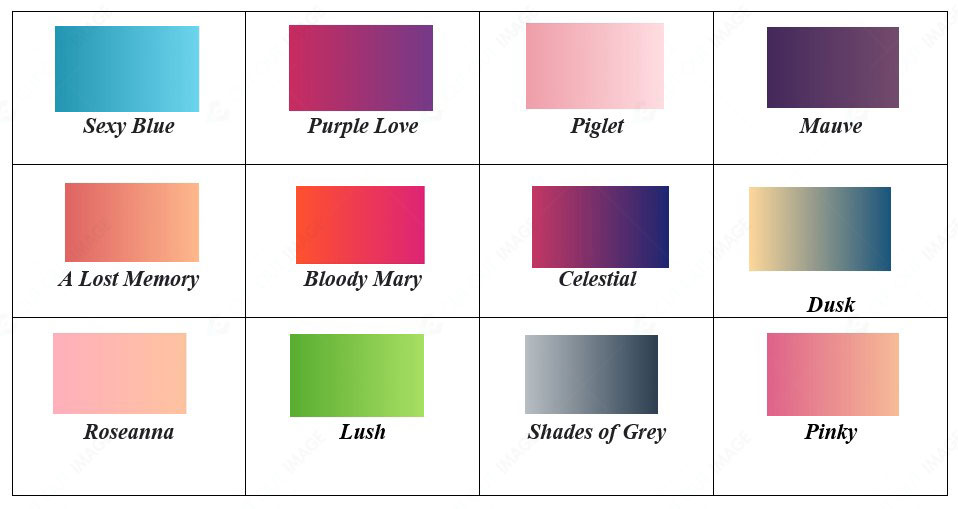
A few more tips for creating the best Gradient in photoshop are:
- Don’t use more than two colors in your Gradient. Two colors are suitable for creating a lovely view. However, more than two might create a distasteful vibe.
- Try to avoid clashing colors. To get a clear idea, you can visit uiGradients or take help from Adobe Color CC, which will let you find matching, monochromic, triad, complementary, mix, and shade colors using a color wheel.
- Use a linear gradient for a square or polygonal shape, whereas you can use the radial gradient for round-shaped areas.
- To blend color into the fill areas, always adjust the opacity.
Why is Gradient Trendy now?
As informed earlier, the Gradient has returned and positioned in modern design, including branding, typography, UI, etc. If you notice, you can find that more prominent brands like Instagram, Firefox Mozilla, Messenger, etc., are now using Gradient for their logo and websites.

So, the question is, why is the Gradient trendy now? There are several reasons for this, and here are a few of them mentioned below:
- Gradients are invaluable for adding life to images and designs.
- Using Gradient in Photoshop, we can fill any text and shapes, making them attractive.
- We can colorize a photo using the Gradient tool of Photoshop.
- We can add colorized effects with style on photos by applying Photoshop’s gradient tool.
- Because of being colorful, gradients are impressive and extraordinary.
Though color blend and Gradient are different, many mix up these two. A color blend is the intersection of two colors overlapping each other, whereas a Gradient is the gradual progress of two or more colors.
Practical Use of Gradients: ( How To Create a Gradient in Photoshop )
Gradients are universal and reliable for any design. It creates colorful and playful vibes in the design; therefore, it could regain its position in the design world. Let’s know some practical use of gradients:
#1. Logo:
A logo represents a brand, and a gradient can add a unique feel to the logo to make the brand stand out from the crowd. You should apply a softer color to create a modest effect on your logo. However, you can apply bold colors to create a flagged vibe for your logo to remember in the future. For example, check out the logo of Instagram, messenger, etc. They are applying the gradient in their logo innovatively and visibly.
![How To Create a Gradient in Photoshop [ Expert Opinion ]](https://www.cutoutimage.com/wp-content/uploads/2022/08/Practical_Logo.jpg)
#2. Packaging:
Do you want to make your packaging eye-catching among other packages? Try gradient as the background for your product packaging. While applying the gradient, ensure your color suits the brand and the product. For example, if face wash is your product, you should use a soft color gradient, while you can use a bold color gradient for sports products.
![How To Create a Gradient in Photoshop [ Expert Opinion ]](https://www.cutoutimage.com/wp-content/uploads/2022/08/Practical_Packaging.jpg)
#3. Web Design:
Gradients add a stylish colorful feel to any website or page design. You can apply the gradient as your website’s background or focal point from small businesses to larger enterprises. You can apply a blend of soft colors for a modest background. Then you can significantly influence by adding a gradient with bold colors to design articulations.

#4. Apps:
In modern times, there are numerous apps on different matters. You can apply a color gradient in your app if you want to make your app pop up in a sea of apps. You can use a gradient for the app material, background, or UI elements. In addition, you can set the app’s mood with the color gradient. For example, you can add bold colors to construct an enthusiastic mood while pastels for a soothing vibe.

#5. Print Material:
Though a gradient color background is not appropriate for Ecommerce Photo Editing, you can use it for your print material like business cards, book covers, posters, etc.
![How To Create a Gradient in Photoshop [ Expert Opinion ]](https://www.cutoutimage.com/wp-content/uploads/2022/08/Practical_Print.jpg)
#6. Social Media:
Gradients are an excellent way to create an aesthetic and dreamy social media photo. Such creative and visually pleasing photos are great for grabbing the audience’s attention.
![How To Create a Gradient in Photoshop [ Expert Opinion ]](https://www.cutoutimage.com/wp-content/uploads/2022/08/practical_Social.jpg)
#7. Presentation:
Gradients can make your presentation visually more appealing by adding creative color elements. To get the best output, try gradient in the background.
![How To Create a Gradient in Photoshop [ Expert Opinion ]](https://www.cutoutimage.com/wp-content/uploads/2022/08/Practical_Presentation.jpg)
Guideline for Using Gradients in Logo Design
Many dislike the gradient for the logo, thinking it is unfashionable, while others love it because of popping out colors. However, two types of gradient logos are available in the design world. They are- icon-based logos and text-based logos.
Whatever type of logo you use, you should consider the below things while using a gradient for your logo:
- A gradient logo is not suitable for every business. Therefore, when designing a logo with a gradient, you should think if the color represents the vibe of your brand. For example, a gradient logo will be perfect for an art shop or a party planning business, whereas it will contradict a pharmacy business.
- The gradient looks better on screen than on printing. Therefore, it will be beneficial to use a gradient logo if your business is online-based. A gaming app definitely can create a great vibe using the gradient.
- You should not use a gradient in the text-based logo because if you apply it, it might make the text unreadable. Moreover, it might distract the attention of the text. Therefore, using a gradient in an icon-based logo can bring the best result.
Here are more tips to follow while creating a gradient logo for your business. Let’s know those do’s and don’ts.
- Don’t apply the gradient color first. Instead, create a basic design for the logo and then apply the color. It will provide an initial idea of what your logo will look like.
- Don’t pick a random color for the logo. The color pattern in the gradient logo should match the brand to remind viewers about your brand instantly.
- Don’t use intense or bold colors to make the logo eye-catchy if it doesn’t soothe the eyes. Remember, simple = professional. Therefore, use a simple gradient color that adds a professional and soothing vibe to your logo.
- The contrast between the logo and background is essential. Therefore, don’t put a gradient logo on a colorful background with contrast. Ensure the gradient logo doesn’t clash with the background color.
- Create a gradient logo print-friendly. For example, don’t use a low-quality gradient if you need to make a print copy. You must use a high-quality gradient to ensure clear and sharp printing.
A gradient tool is a powerful tool of Photoshop. It is adaptable for generating any creative design. You can utilize the gradient for your company logo, website, or print materials to stay ahead of the competitor’s crowd. In this blog, I discussed how to create a gradient in photoshop with a few simple steps. I also have shared all the possible ways to make the gradient attractive. I hope you can apply a simple gradient to a photo, layer, or text by following these steps. So, practice the technique to be efficient and create great results.

